Dynamic Collections: a deep dive
Dynamic Collections Rules:
1. You cannot add files- You cannot add files manually or use the right click function to add files to a Dynamic Collection. Every time you open this type of collection, it runs a new project search based on the original search criteria and updates the collection with any new files or folders fitting the search criteria and removes any files that no longer fit the search criteria.
2. You cannot delete files-
3. However, any edits made to a Document in a Dynamic Collection are saved.
4. Every time you click on a Dynamic Search, it runs a new search based on your current search criteria. (See updating search criteria further down on this page, if you want to change criteria.)
5. You can use the Menu command Navigate > Collections > Convert to Standard Collection to change any Dynamic Collection you are currently viewing into a Standard Collection.
Creating a Dynamic Collection from a Search Result
Run a project search and you will see your search results in the collection window listed under Search Results. (Which in itself is a dynamic collection.)
2. Left Click the magnifying glass left of the search bar. This allows you to adjust your search criteria. (See #1 below)

3. You will see a menu of search options and at the very bottom of this menu, will be the option to Save this Search as a Collection.

After you do this, you will see a popup window to name this new Dynamic Collection.

4. Click this option and you now have a new Dynamic Search Collection that will run a new search using the original criteria from the Search Results. By definition the current Search results will remain unchanged until you do a new Project Search and those results become a new Project Search.
5. Note: This saved search can be saved/converted to a Standard Collection just like any other Dynamic Collection. (discussed later in this article)
Scrivener Tip:
To make it easier to distinguish between Dynamic and Static Searches you could use certain colors for dynamic searches, use a unique symbol, or the letter D (for dynamic searches) to differentiate at a glance the different types.
You can pick different color options by clicking downward facing caret to right of search title. You will have the option of a small number of default colors, or you may choose any of number of included preset Themes (such as) > Faraday > reddish color-clear demarcation

Use the Reveal in Binder function for Search Results
If you select one item, multiple items, or use Ctrl + A to select all of a search’s results you can choose to reveal where those search results appear in the Binder by one of two methods. (You must choose at least one document for this command to work.)
Right Click on the selected files and choose the Reveal in Binder option
Use the Menu command Navigate > Reveal in Binder
After doing this the Binder will be shown and the selected files will be highlighted in the Binder.
The Collection Header Bar

The Dynamic Search Collection Bar above is different than that of a Static Collection.
Header Bar options include: (see image #1 above):
A. Click x to close the Collection.
B. Click the bending arrow to display all the current Search contents in either the Scrivenings, Corkboard, or Outliner Views.
C. This Binder Order option gives you choices on how to arrange your Search Results by Binder Order, Sort by Title, Date, or Newest First. You can change the order if this helps in reviewing the search results, these are not permanent changes. (The heading will change based on how you are sorting. See examples below.)

D. The magnifying glass indicates that the currently chosen search is a dynamic one and the results will be regenerated every time you click on the collection to get the latest results. (You can not add or remove items from this list as you can in Static Collections.)
The Footer Bar
Is the same as the Footer Bar in the Binder.
Updating/Changing the Search parameters for a Dynamic Search
1. Start with an active search.
2. Open the project search if not visible.

3. Left click the magnifying glass just to left of the words in the search bar with your mouse and adjust the criteria.

Note: A Scrivener Tip- Holding the Alt key and left clicking the magnifying glass allows you to choose one additional search category or option in the Search In section at a time.
4. Any changes in the search criteria will be automatically saved for this Dynamic Search Collection and used going forward.
Converting a Saved Dynamic Search to a Standard Collection
Given their dynamic nature, the contents of a saved search list cannot be added to, removed from or reorganized (outside of sorting).
If you wish to “freeze” a search list so that you can play with it freely, or simply to store it for later reference, there are two ways you can do this:
1.) The first way is conversion.
A. Open the Dynamic Collection you want to convert to a standard collection.
B. Use the Menu command, Navigate ▸ Collections ▸ Convert to Standard Collection. This will convert the Saved/Dynamic Search to a Standard/Static type. This will destroy the active search functionality, so only use this method if you no longer need the search criteria.
2.) The second way is copying results.
A. Select the Collection to convert.
B. Click the + sign to the right of the collections header to create a new Standard/Static Collection and name it.
C. Click inside the original Collection and use Ctrl + A to select all the results.
D. Drag the results onto the name of your new collection.
E. The new Static Collection will have all the results of the previous Dynamic Collection but can be modified by subtracting or adding more files.
Note both Dynamic and Standard Collections can be included within a Project Template.
Special Issues with Dynamic Collections.
Issue: You cannot create a Dynamic Collection if you have selected the Search Binder Selection Only option in the Options section of the Project Search choices. (see below)
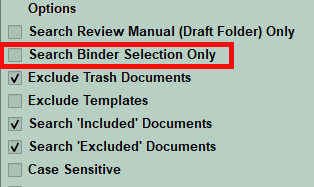
This is a deliberate choice by Scrivener, but you can still use a Dynamic Collection to search a Binder Selection by following the steps below.
1. Create the Dynamic Collection by doing a Project Search using any criteria you want (except above).
2. At the bottom of the Project Search Options is the option to Save Search as a Collection.
3. Choose this and name your Dynamic Collection.
4. Now exit the Project Search interface.
5. Select a group of Binder items you want to search with your newly created Dynamic Collection search criteria.
6. Click on the Dynamic Collection to run the search. (You will get the results of searching the whole Binder)
7. Now click on the Search options and check the Search Binder Selection Only. The Dynamic Search will now be restrained to the Selected Documents and the Dynamic Search will be run again and you will see the results from searching ONLY the selected Documents.
8. When done be sure to UNCHECK the Search Binder Selection Only box to restore the Dynamic collection to a whole Project Search.
You can do this again in the future with different groups of Binder Documents to allow a focused search.