using and creating Project templates
What is a Project Template?
This is nothing more than a Scrivener Project where the unique information in the Manuscript and some in the Research Folder has been removed to create a reusable structure that can be used in future Scrivener Projects. Your intended use will impact how you create this custom Project Template. Scrivener includes several basic Project Templates for writing Novels, Plays, etc as well as a Blank Template to start from Scratch.
To open a New Project Template in Scrivener:
1. Use the Menu command File> New Project
2. Or Use the windows shortcut Ctrl + Shift + N
(Either brings up the Project Template interface which will be reviewed later.)
3. Holding down the Shift key while launching the Scrivener program will open Scrivener at the Project Template Window as opposed to open the last Project you were using.
In the Project Template interface, select a Project Template by double clicking it or clicking once and using the Create button in the interface footer.
Project Template Facts:
Project Templates are ordinary projects that have basic starter material added to the binder, settings tweaked, and useful information added to help you start your new project. You can even open a blank template if you wish to start with a clean slate. These serve as starting points and can be customized to fit your personal work flows.
Basically consider a Project Template as a blank Project with a unique structure.
Scrivener’s built in Templates will include a help document at the very top of the binder and contain step by step instructions for popular modifications. (see below)
Scrivener’s built in Project Templates cannot be overwritten or modified, BUT any new projects created from them can be modified and saved as a new Project Template. These new personal Project Templates can be modified any way you want.
A good starting point can be a current Novel/Nonfiction/Academic project that you have customized and organized to your liking. You can save your current Project as a new AND separate copy from the original one by using the Menu command File > Save As function. This creates a duplicate of your current project and any changes made to the copy does NOT affect the original one. Make sure you give a unique name or functional name like Future Novel Template to avoid confusion. Now strip out the writing from the the Template project and leave the structure, templates, custom icons, metadata, layouts, styles, and any other information you will need going forward and discard the rest.
Templates can—
Give you a starting point.
Simplify your writing process
Saves you time and money
Increase flexibility in your writing process

Project Templates can contain/be customized with:
A Custom Title and Custom category
Custom Labels and Status definitions
Custom Keywords
Project Bookmarks (With lists of writing resources, research portals and can include links that refer to information stored on your computer, other Scrivener Projects, the web, or within the Project Template itself)
Compile Settings (ie Custom Compile Formats such as for an ebook with custom Section Layouts, front and back matter folders)
A Template Folder with a preset group of Document Templates (which can include preset word targets), chapter or book template, Character Sketches, Settings, etc.
Collections (Static or Dynamic) with preset search criteria
Custom Icons
Custom Layouts
Project and Session word targets
Project Backgrounds
Compile Formats can be saved either with the specific project (Project Formats) or for every available project (My Formats) to be included with a specific Project Template
Styles including Paragraph and Character styles can be saved or imported from another project for your project template
Structure-such a as novel setup with Acts, Chapters, and Scenes which can be based on popular plotting methods like the Hero Journey, Save the Cat, and Seven Part Story Structure. Or you can include preset scene questions in the Note Section of the Inspector.
You can even rename the Manuscript and Research folders if you want.
Some built in folders such as the Characters folder could be set to use a specific Character document template if a file is added to these special folders
Template Placeholders can be helpful if you plan to share these templates with others and do not want to include your personal information.

If you click the checkbox Save styles in the Template, this will preserve the current styles being used in the project you used to create this new Project Template. (see below)
Remember these Project Template Facts:
1. You can import Keywords, Labels, Status, and Metadata from any existing project into your newly created Project Template, Collections (especially dynamic ones connected to keywords, labels, status )
2. Anything that you save in a existing project can be included a Project Template.
3. It is Easier to start with an existing template closest to what you want and then modify, relabel, and rearrange elements rather than starting with the default blank Template included with Scrivener.
4. But you can start from Scratch
5. Customize metadata the way you want (or import from another project). Then once set up can use again and again for specific tasks like novels, poetry, short stories, blogs etc.
6. You can set up the classic novel Acts, Chapter, and Scene structure for the whole novel and include word targets for individual scenes.
Creating a New Project Template from an existing project.
The easiest way to create a new project template is to take an existing project that’s set up the way you want it and use it as the basis for your new template.
The key thing to remember is that EVERYTHING in your current project gets copied:
All your Metadata including Labels, Status, Keywords, and Custom Metadata. (Much of this information can be dragged from one project to another when creating a new Project Template to save you time and avoid reentering the same information. But this can be included with a Project Template)
Author Information (under File > Options > General > Author Information). For personal templates this is fine, but if decide to share a template you may want to remove this information from the New Project Template.
Section Types
Everything that’s in the Binder (structure, files, images, imported docs)
Custom Icons
Collections
Custom Compile Formats/settings. Note: Some of the preset Scrivener Formats also have unique Compile Formats associated with them. Note Project Formats are project specific, while My Formats are system wide.
Project Bookmarks/References to files on your computer or on the web.
All project-specific preferences such as default text styles, full screen settings, typewriter scrolling, toolbar icons, and scrivener themes, layouts, etc.
Saving a New Project Template
First, use the File>Save As function to save the Project with a new name such as Delete Me. This is the throwaway project you will use to create the new Template without effecting your original project.
Open the newly created Project.
Strip out all the files and folders holding information you do not want. Replace these with blank files and folders in a structure that will support your planned uses. (For example; with novels, you might include folders such as acts, chapters and scenes all including preset word targets and custom icons.) Remember, you are keeping the shell to start fresh for future projects.
Add what you need including Front and Back Matter folders, Character Folders, a Scraps folder for deleted scenes, or scene fragments, Notes folder for things to work on or expand as write, or anything else you find useful. You could include Editing Modules with a collection of information about editing, including your personal word issues, grammar rules, or articles on how to edit.
Review your Template Folder and keep, discard, or add any Document Templates you want for this New Project Template. (You can drag in Document Templates from any existing Project, or any file or folder to become a new Document Template for your new Project Template.) Add additional information for your Document Templates
Add any styles, labels, status, keywords, custom metadata, or icons you want to include in your new Project Template.
To Save a newly customized Project as a new Project Template do the following;
1. When you have finished, then use the Menu command File > Save as Template to create your own new custom Project Template. (see below)

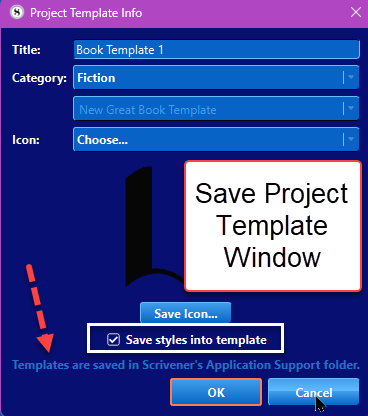
The File > Save as Template option brings up the dialog window shown below to name the New Project Template by clicking and editing the Title. In the field below, you can assign the new template to a category or Create a custom category.
Remember to click the Save Styles checkbox in the Panel below to preserve your current Styles.


Category choices including a custom category.
Project Template Info to Include:
Title —
The visible title of the template, as you want it to appear in the template browser. Make sure you give it a memorable name. I suggest including the year created as well. Over time Project Templates you create will change and grow to fit your needs. Adding a date can help you choose which one might be best for a particular Project.
Category —
Declares which section to add the template to in the browser.
Select “Custom” to create your own category, using the name supplied in the text field below. Any existing categories that have been installed into the software will be listed here for your convenience.

Icon —
Here you can select the appearance of the template thumbnail. You can choose from a number of available presets, or if you wish to make your thumbnail stand out from the built-in templates, you can click the Save Icon… button, which will generate a file for you based on the currently selected thumbnail. (You can even use png and ico files that you have imported as Scrivener icons or choose premade options.)
Styles-
Save Styles into Template: If you have created paragraph or character styles which you prefer, you may want to save them to your new template so you can reuse them. (see below Icon, option to click to save styles)
*****Note: Templates are saved in Scrivener’s Application Folder.

To open this New Project Template as a new project for Scrivener:
1. Use the Menu command File> New Project
2. Or Use the windows shortcut Ctrl + Shift + N
3. Both methods bring up the Project Template interface below.
The Project Template Window Interface


Other Options tab choices include:
Setting Default Template when open the project template window. This template will be highlighted when you open the Template chooser.
Hide Getting Started options in Project Template window hides the Getting Started category.
Importing Templates includes the steps below:
A. Open project Template Window-File > New Project
B. Click the Options tab in the footer and chose Import.
C. Migrate to the folder holding the Project Template using the Windows Explorer and click open to import the Project Template.
D. You can use the Menu command File > Show Application Support Folder to see where Scrivener stores Project Templates if you have trouble finding your newly created Project Template using the Windows Explorer.

Export Templates (This is the method to transfer Project Templates between different computers if you use multiple ones.
Edit Template Info (This choice is only available for templates you create or import but not for Scrivener default templates)
Reveal Template File Location (will show its location in windows explorer) By default Templates are stored in Scrivener’s support folder. (Menu dropdown-File> Reveal Application Support Folder will get you there easily under project templates subfolder.)
[Consider backing up all your created templates into another folder besides Scrivener’s default location. Ideally in a cloud folder or externally as an additional backup to protect your time used to create these and allow access to these Templates if you are in a remote location working.]

Delete Template (Built in Templates cannot be deleted.) You can only use this function on Templates you create or import.

Open Recent:
Allows you to see recently opened projects and choose one to open to form the basis for a new Project.
Open Existing:
Will open the Windows Explorer window and allow you to navigate to a folder containing a Scrivener Project and open the Scrivx file. (This functions the same way as the File > Open command in the File Menu options does.)

Your final option occurs when you click a Project Template to use for a new Project. You will see a new button appear (Create) when you select a Template. (see above)
The Create tab:
This will make a new Project using the Project Template you have chosen. You will see the windows file explorer open. You will create a name for the Project and decide where to save this new Project. Ideally all projects should be saved in one folder that MUST BE separate from the save folder.
1. Your window will be titled Create Scrivener Project
2. You will choose a name for this new Scrivener Project
3. You will choose a location for the project. Ideally in the same folder holding your other Scrivener project folders.
5. When satisfied, where the new project will be saved, then click the save button to create this new project.
NOTE: You can save a new Project Template without adding your personal information. To do so hold the Ctrl + Alt keys while clicking the Save button this stop the substitution/replacement of the Placeholders with your personal information. This allows you to export a template without any personal information.
Note: you can also right click on the Project Templates panel window and have various options as well.

Editing Template Info will modify how the template appears in the Template Chooser. (You can change the name, icon, and category from this menu.)
Points to Remember:
Once you customize the Project Template and save it, then the copies of that project template and all other project templates are stored at the same folder location by default. This is the Scrivener Application Support Folder, but you can save a copy anywhere else as well. Note in the Project Template window you have various buttons with choices at the bottom. One is Options tab which includes the Reveal Template File location and you can use this to go there and copy the Template file and save elsewhere like a cloud based folder or to share with others by exporting. This way you can create your own Custom Novel Template and base it on an actual book project you have used and customized. This can serve as the basis for an improved custom Project Template that can be upgraded over time and give you a head start on new Scrivener Projects in the future..
Built in Scrivener Templates cannot be overwritten or modified directly. However, you can use the default Scrivener Templates to create a new project and THEN modify this newly created custom project. So with extra steps you can modify copies of Scrivener’s default templates.
If you store any Project Templates that you create in a cloud based folder, then these can be imported and used on other computers you use Scrivener with.
Right clicking on any Project Template includes the option to Reveal File location, or this can also be found by clicking the options button at far bottom left which also has the Reveal File location.
You can overwrite/update an existing template with updated information including styles, metadata, templates, and collections etc. Even additional icons can be added to a project as well and themes.
A Blank Template is distraction free and only has the Manuscript, Research and Trash Folders. You can create a Custom Blank Template by taking you favorite current template, using the File > Save as menu to create a copy and then strip it of everything. This will leave custom icon, fonts, templates, metadata, and layouts, but otherwise start with a blank slate.
As you become more familiar with Scrivener and how to use the Program, your needs will change and your custom Project Template structure and features will evolve. (Adding a date for the year of creation can be helpful as well.)
Overwriting an existing custom/imported Project Template
If you update an existing custom template that you have modified using the methods detailed above and then save it using the name of the original custom template, then you will see the window below.
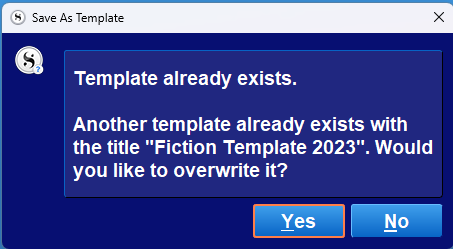
Click Yes to update this Project Template.
Click No if you want to save the older custom Project Template. Adding a date but keeping the title is an easy way to track the evolution of a Custom Template over time.
After you have modified a COPY of a Scrivener Project, you can now safely delete the Project you used to create the Template if this was a throwaway project for this purpose.
Importing a Template
First find and download templates. If these are compressed (zip files) they need to be opened (extracted) before they can be imported into Scrivener. Now store these templates in a folder you will remember and consider placing them in a shared folder of your chosen cloud service if you work on Scrivener from more than one location. Templates opened on one computer will NOT be available on the other computer unless you have imported a specific Project Template on that computer as well.
This is why saving another copy of any custom Project Templates on a cloud folder can help when working at multiple locations or on multiple devices.
Open Scrivener.
Go to File > New Project in the Scrivener Top Menu.
Locate and click Options in the bottom left corner of the New Project Window.
Select Import templates and navigate to the unzipped templates.


Select a SCRIVTEMPLATE File to open to Import the chosen template.
Please note that Scrivener will not allow you to import the template if is still compressed or zipped.
Go back to Scrivener File > New Project. Now you will see the new template is available for use.
Opening a New Project Template
In any existing project go to your menu and choose File > New Project and bring up the window below to choose a template for a New Project.
Options include Default preset Scrivener options, Any created or imported Templates.
Clicking All shows every Project Template available at once.
Choose a Project Template for the new Project and click Create in the lower right corner.
(Note: You can take this Template and change it by adding or subtracting custom information and then save it as a new template replacing the one you just opened and saving as a new Project Template.)
File>Save as Template
Renaming a Project via Two Methods
1. Use the Menu command File > Save As function allows you to save a project with a different name, BUT this project is now new and severed from the old project. This project and data only starts from when it was created.
2. Rename Project Folder- If you rename the project folder in Windows explorer then the Project Name.scrivx file will automatically change to match the new folder name after you click on it to open the Scrivener Project. The project will open with the new name, but contain all the data from the project you just renamed.
Merging Projects Together
If you want to merge Novel A project with Novel B project, then use the Menu command File > Import > Scrivener Project. If you only need research material or limited information, you can put bookmarks in another project to link this material, or even drag copies into a second project.
In Conclusion
Creating Custom Project Templates is crucial in allowing you to organize a project to get the maximal benefits from Scrivener and once created this can be used again and again, which saves a lot of time customizing the default templates. This can also change as how you use Scrivener evolves. Or you can use a simple default template when you start and save advanced custom templates for later.