Bookmarks overview Part Two
More about Bookmarks
Two Classes of Internal Bookmarks
A.) Project Bookmarks (Project wide so the Bookmarks are available in the Inspector Bookmark Panel to every file/folder in your project.) These can be added by dragging files or folders onto the Bookmark Icon in the toolbar, into the Bookmark Panel, adding to the Project Bookmarks in the Inspector Bookmark Pane, and by right clicking on any file/folder in the Binder and choosing Add to Project Bookmarks.
B.) Document Bookmarks (File specific Bookmarks only associated with that document.) You may only want certain bookmarks available when viewing a single document/scene. This is a great way to link pertinent internal documents associated to a single file/folder. You can add Document Bookmarks by dragging files into the Document Bookmarks in the Inspector Panel. This can also be done by dragging the files/folders into the Bookmark pane of a Quick Reference Panel. Only Document Bookmarks can be added to a QRP.

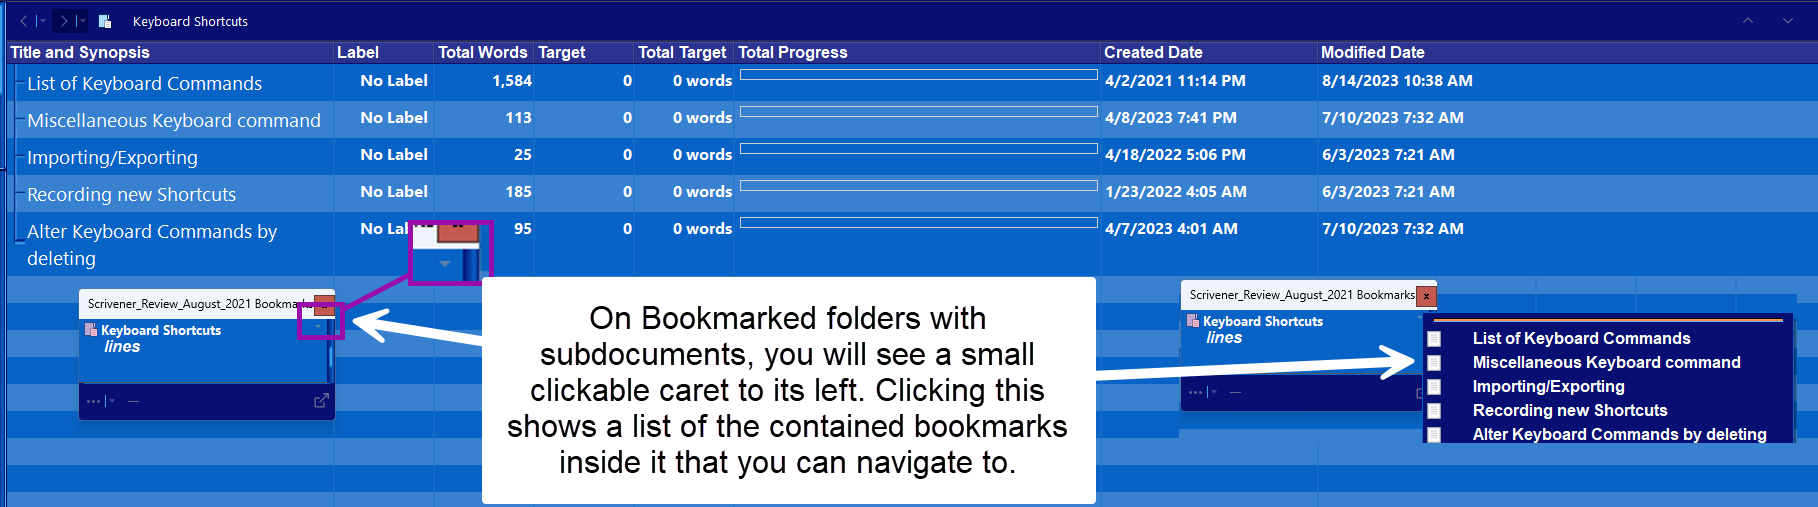
Note folder bookmarks will have a small dropdown caret to show their contents which can be displayed in the panel below the bookmark list.

Note using this method with the QRP which floats above the Project makes it easy to navigate thru the project to select files to add to the particular file/folder when displayed as a QRP. You can also do this with a split editor view and the file you are adding Bookmarks to being locked to prevent losing your place as you move around the project in the other window.
For example: A character document might be included in scenes where that character appears. If this document is open and you drag files/folders into Inspector Bookmarks (Document Bookmarks) or the Bookmark Pane of a QRP , then Bookmarks for that file are added as as internal bookmarks for that file only.

Note: The selected Bookmark in the Inspector will have a shaded background with the degree of shading varying by Scrivener Theme. (see above)
The color of the background for the bookmark preview area is set in the Options Panel under Appearance Section.

Bookmarks can even be lists of useful links to characters, locations, or stored editing resources. This allows one Bookmark to function as a hub to many needed writing resources.

Opening the Bookmark Panel
1. Click on the Bookmark toolbar icon
2. Keyboard shortcut Ctrl + Shift + B
Open Bookmarks in the Inspector Bookmark Pane
1. Two clicks will open the Bookmark. How it opens is set in the Options Panel. (The default choice is as a QRP) To change how a Bookmark opens go to File>Options>Behaviors>Document Links-Open Inspector Bookmarks in: (and choose a different option)
2. Highlight a single Project or Document Bookmark and click the return key/enter key. (see above which also affects this action.)
3. Right clicking on a Bookmark will show multiple other options on how to open and other choices. This also works for the Bookmarks in the Bookmarks Panel. (In the Bookmark view of the QRP the only right click view option is as a QRP.)
4. Drag a Bookmark into the header bar of the editor window and this will open the Bookmark.
The right click options are different if the Bookmark is an internal document or an external bookmark (Such as a file on your computer, or web link.)
How will the Bookmark load or be displayed in Scrivener?
If you right click on a bookmark, then you will have multiple options on how to open it.

Internal Bookmark Right Click Options
A.) Internal Document Bookmarks have the following unique options when right click on the file/folder:
1. Open in the Current Editor window if the only one, or split the editor view to show in the other editor.
2. View on Copyholder (This will open a Copyholder window to view it or place the Bookmark in a Copyholder that is already present in the Editor window.)
3. Open as Quick Reference (Panel)
4. Reveal in Binder (Show the file’s position in the Binder.)
5. Rename Document (Remember that renaming an internal Bookmark renames the Binder item as well.)

External Bookmark Right Click Options
B.) External Document Bookmarks lack those above but add the following unique options when right click on the file/folder:
1. Open in External Editor (ie a program capable of handling the file)
2. Open File Location (on your computer)
3. Edit Bookmark (Either the name of the Bookmark or its path to the file.)

What the common right click actions for both types of Documents mean:
Add External Bookmark (URL links)
Creates a new row in which you can manually copy and paste or type in a given description and valid URL or file path of the resource you wish to link to.

This is most useful for creating links to the Internet, as you can just paste in the URL you have available, but all kinds of URLs work here. (Copy and Pasting links minimize errors and is the best way to go.) How these links appear in the Inspector is controlled by which options you choose in the Options panel below.

Add External File Bookmark
Refers to files on the computer. Note the link will be broken if this file is moved or deleted from your computer. Creating this will create a viewable link to a file on the computer. When clicked. this will open the Window file explorer and then you navigate to the file you want an external file link to.
Open in Current Editor
Replaces the current editor file/folder with the selected Bookmark.
Open in Other Editor
Opens the selected Bookmark into the inactive editor, opening a split view if necessary to do so.
View on (Current Editor’s /Other Editor’s) Copyholder
The bookmark’s content will be viewed in the copyholder for the designated split, or into the main editor’s copyholder if there is no split view in the Editor window.
Open as Quick Reference
A window will be opened, displaying the content of the chosen Bookmark. This is the default behavior.
Every QRP has a Bookmark icon in lower left footer and clicking this will open a window to view the Bookmark Panel.
Open in External Editor applies only to External Bookmarks.
Open File Location applies only to External Bookmarks from your computer. Choosing this option opens the Windows Explorer window showing where the file is currently located on your computer.
Reveal in Binder option is for Internal Bookmarks only and shows its position in the binder with that file highlighted.
Rename Document applies only to Internal Bookmarks and allows you to edit the name. Doing so will change the name of that file in the Binder.
Edit Bookmark only applies to External Bookmarks and allows you to change the name of the file or edit the path on the computer or the web address by clicking in the appropriate field.(Or both.)
Any existing bookmark’s title can be edited by pressing the F2 key with a single bookmark selected or highlighting the title of the bookmark.To finish editing, press Esc or click elsewhere to confirm.
This can be really important to rename weblinks to something that makes more sense

Web Address

Computer file with the path to the file.
Opening Bookmarks in the Bookmark Panel.
1. A single click will open the file in the main Editor window in the current format in which it was last opened. (IE Document, Corkboard, or Outliner view).
2. Right click and choose one of the various options which are the same as for internal Inspector Bookmarks above and vary based on whether the Bookmark is Internal or External.
Opening Bookmarks in the Quick Reference Panel Bookmark Panel.
1. A single click will open the file in QRP to the left of the Bookmark pane. Note the QRP will not show group views like the Corkboard or Outliner View. External links may or may not appear with one click.
Note: For Bookmarks opened as a QRP, there are only two right click options when click on the Bookmark icon. They are Reveal in Binder and Take a Snapshot.
The lower portion of the bookmark inspector tab is a fully-capable media viewer and text editor, very similar in fact to a Quick Reference panel or copyholder, in that all formatting capabilities will be present, but with a focus purely upon the text or media content of the thing you’re working with.
Any text edits in the Bookmark preview pane will change the original[[ Lee deLacy, 6/8/2023 12:19 PM testing idea]] file. As you click on bookmarks in the upper half of the tab, they will be examined—to the best of Scrivener’s ability—in the lower half.
Three differences between the QRP Bookmark Panel and the normal one.
1. There is no option to convert a Bookmark into a QRP. Clicking on files in that list bring up the Bookmark in the current QRP panel.
2. The + sign allows the creation of a new Binder file and Project Bookmark at the same time. You can designate the default location where new bookmarks are placed in your project under project settings.

3. You can have the both QRP bookmark panel and the QRP interface opened to Bookmarks at the same time. Any file dragged in here from the Binder becomes a Document Bookmark. Also any file or folder dragged into the QRP Bookmark panel becomes added to Project Bookmarks.
Depending on your screen resolution and monitor size, you may need to make the QRP window smaller to see both open at once.

In the Inspector Header Bar
A small * symbol will appear next to the Bookmark Tab (upper right area of icon) indicates a document has an associated Bookmark for this file/folder

The Bookmark Viewer: The lower portion of the bookmark inspector tab is a fully-capable media viewer and text editor, very similar in fact to a Quick Reference panel or copyholder, in that all formatting capabilities will be present, but with a focus purely upon the text or media content of the thing you’re working with. As you click on bookmarks in the upper half of the tab, they will be examined—to the best of Scrivener’s ability—in the lower half. For external file links, only those research files that Scrivener itself can display will be previewed. You can always double-click the icons of such bookmarks to load them in an external viewer or a program that can open them.
You can add one project’s file or folder into another Project as an external Bookmark to link the projects.
If you right click a bookmark and hold on it can drag it from bookmark panel of one project into binder of another and that bookmark file has now been added as a file to another project.
The easiest way to do this is to drag the file into the other’s project bookmark panel OR into the Inspector Bookmark panel (either the Project Bookmarks, or Documents Bookmarks file and will see and Scrivener S icon with a a curved arrow for the special external bookmark. (see below)

You can copy internal bookmarks from one file to another.
(Note: A single or multiple Bookmarks can be moved to another file at one time.)
Open the intended destination file as a Quick Reference Panel.
Change the view of the quick reference panel from editor only to bookmarks. These bookmarks are document bookmarks only and you cannot change them to project bookmarks in a quick reference panel.
Now open the file that you want to transfer bookmarks from. These can either be project bookmarks or document bookmarks. Either can be dragged into the quick reference panel bookmarks section and project Bookmarks will become Document Bookmarks for that particular file/folder.
Once you have finished dragging any bookmarks that you want to add to that particular file, then close the file. Now, when you click on the file in the Binder, the bookmarks you added will be in the document bookmarks section. If you drag bookmarks from the project bookmarks group, they will be listed under document bookmarks for that file. You are taking a copy of the bookmark not removing it from the file you are pulling them from. This does not transfer the bookmark, but transfers a copy of the bookmark.
If you drag bookmarks from a QRP into a different binder file’s Inspector bookmark panel, these can be placed into EITHER the Document or Project Bookmarks.[[ Lee deLacy, 6/8/2023 12:21 PMtesting idea.]]
You can select and drag multiple bookmarks at one time from one file to another, but you cannot duplicate bookmarks in the same file.

Organizing Bookmarks
Bookmarks are organized by default in the order they were created. You can adjust their organization to suit your uses of them. The order of bookmarks within a list impacts their order in every context where they are displayed.
If you click a bookmark inside the Bookmark Panel or a Project Bookmark in the Inspector window, then the Menu command Edit > Sort > In alphabetical order ascending or descending can be used to arrange alphabetically
Click and Drag Bookmarks: You can manually reposition Bookmarks in the Bookmark Panel, Project Bookmarks in the Inspector bookmark panel, or the smaller Quick Reference Panel’s Bookmark Panel. Changes in one will be seen in the other views.
Bookmarked Folders
Windows Bookmark tips
1. Holding the ALT key when clicking a bookmark will open it in the other editor in a split view or will split the editor and display the file in the other editor pane.
2. You can set the default way Inspector Bookmarks open when clicked on by using the Options Panel. File>Options>Behaviors>Document Links>Open Inspector Bookmarks In- and can choose open as a QRP among other options.
3. External Bookmarks to files on your computer or the Internet can be saved in Project Templates and will work in future projects as long as you don’t change the file location of the Bookmarked information, or the Internet address does not change.
4. Any existing Bookmark’s title can be edited by pressing the F2 key when a single bookmark is selected. Once finished, press the Esc Key or click elsewhere to confirm. Renaming Internal Bookmarks will also change the name of the Binder file/folder as well.
5. In the Quick Reference Panel you may need to shrink/change the view of the panel to see the Bookmark Panel if click the Bookmark Panel marker in the left footer.
6. Quickly Deleting Bookmarks Anywhere
1. Select a Bookmark in the Inspector Pane, Bookmark Panel, or the QRP
2. Use the keyboard command Ctrl + Del key to send this Bookmark to the trash