bookmarks smaller topics
Opening and Using Bookmarks
Double-clicking on a internal bookmark can have four possible options on how it opens:
You set how a Bookmark/Document Link opens in the Options Panel. Behaviors > Document Links > Open Inspector Bookmark in-

1. In the Current Editor
2. In the Other (inactive editor window)
3. In a floating Quick Reference Panel
4. In a Copyholder
What each action does-
1. Open in Current Editor
Replaces the current editor with the selected content (Bookmark).
2. Open in Other Editor
Opens the selected Bookmark into the inactive editor, opening a split view if necessary to do so.
3. Open as Quick Reference Panel
A floating QRP will be opened, displaying the content of the selected Bookmark. This is the default behavior when the program is opened. The QRP has the option to open the Bookmark Panel on its left side.
4. Open in a Copyholder
Opens the selected Bookmark in a copyholder in the current Editor window.
Additional Options that are available when Right Click on a Bookmark in the Inspector Bookmark Panel or the Project Bookmark Panel.
A.) View on (Current Editor’s /Other Editor’s) Copyholder
The bookmark’s content will be viewed in the copyholder for the designated split, or into the main editor’s copyholder if there is no split.
B.) Add External File Bookmark
Allows you to create a Bookmark to a file on your computer. Note link will be broken if the file is removed or the file’s location is changed. Creating this will create a viewable link to a file on the computer. When click this option, you will open the windows file explorer and navigate to the file you want.

C.) Reveal in Binder
This will show location of the selected Bookmark in the Binder (if it is an Internal Document)
D.) Copy URL
This will copy a web link for web based files.
E.) The Rename and Delete Bookmarks options are self explanatory.
You can also delete any selected Bookmark in the Inspector by clicking on the minus sign in the header bar, or the minus sign in the footer of the Bookmark Panel.
Bookmark Facts
A.) Hitting the Enter key will now open an Inspector Bookmarks in the default way you chose in the Options Panel (see above).
B.) You can also drag a bookmark into the header bar for either Editor pane to load it there.
C.) You can drag any file/folder from the Binder onto either the Bookmark Icon or Bookmark Banel to create a NEW Internal Bookmark
D.) When merging documents, any bookmarks pointing to documents within the group being merged will be destroyed as they will of course no longer have any meaning.
E. When you create Bookmarks to documents in other Scrivener Projects, they will have a special Bookmark icon with the letter S (see below). Clicking this will open the Project the Bookmark came from. The Project will open at specific location of the Bookmark file or folder.

Bookmarks and Backlinks
You can enable Backlinks via the Menu command File > Options > Behavior > Document Links and check the option:
You can on this panel also enable Image links to create backlinks as well.
With this option enabled, you can click on any image file/or document in the Binder and if you open that image/document’s Inspector Document Bookmark List, then you will see precisely where that document/image has been used within your draft folder.

In the Image (see below) file’s Document Bookmark list are links to all the Binder files this Image is linked to.

Document links and Bookmarks with these options checked will create backlink bookmarks.
When you create document links or bookmarks to other items in the binder, Scrivener will automatically place a “backlink” to the originating document in the Document Bookmarks Inspector tab for the target. This creates a Bookmark list of where a Link Document or Picture has been used in this Scrivener Project.

Composition Mode and Bookmarks
Composition Mode has an Inspector Icon (I) in its footer and clicking this opens a mini Inspector with the ability to view both Bookmarks (Document Bookmarks) and Project Bookmarks.

Navigation of web pages and bookmarks.
Bookmarks to websites or other online resources by default will require you to click a button to load them within the inspector pane. This way as you switch through documents in your draft or browse through the bookmark list, you will not automatically be downloading from websites.
If you would prefer web links to automatically load, then enable this option.
— Checking Automatically load web pages in Bookmarks preview will open the web page when the link is clicked in the Inspector window below the Bookmarks.
— Checking Allow limited navigation in web pages will allow limited navigation in web pages. Hyperlinks found within archived Web files, as well as those displayed in the Bookmarks preview pane, will attempt to navigate within the same view, rather than sending the URL to your default browser. Scrivener is not a dedicated browser, and will not have the same level of protection and security that a browser does. As with the above option, take care when using any feature that downloads raw data from the Internet.
— Checking Allow Java Script to open windows in web pages will allow more navigation options inside Scrivener, but also more potential risks.

Keep Project Bookmarks window on top (applies on next open)
This setting impacts whether the Project Bookmark list will float above the project window at all times.
File > Options > Appearance > General Interface-Options

Bookmarks Preview Background
File > Options > Appearance > Inspector
and
Notes > Colors-Bookmarks Preview Background

Sorting Bookmarks
You can use the Menu command Edit > Sort > Alphabetical order commands to change the Alphabetical order of either Document or Project Bookmarks. If you change the alphabetical order of Project Bookmarks in the Inspector, this will also be changed in the Bookmark Panel. You must click a Bookmark for this command to become active.
Quickly Deleting Bookmarks Anywhere
1. Select a Bookmark in the Inspector Pane, Bookmark Panel, or the QRP
2. Use the keyboard command Ctrl + Del key to send this Bookmark to the trash.
3. Or use the - sign in either the header or footer of the Bookmark window in the Inspector, Quick Reference Panel, or Bookmark Panel.
Migrating Multiple Document Bookmarks into the Project Bookmark Panel
1. Migrate Bookmarks you want to add to a single file when open as a Quick Reference Panel with the Bookmark pane open. Doing this will add these files as Document Bookmarks.
2. Now select some or all of these bookmarks and then click and hold the left mouse button on the highlighted bookmarks and drag them into the Project Bookmark Panel or into the Inspector Bookmark panel when set to view Project Bookmarks. These Bookmarks are now part of the Project Bookmarks and available system wide to every document.
New Bookmarks Folder
You can configure where any new Bookmarks you create from within a Quick Reference Panel are placed. Note you can only do this when the Bookmark Panel of the Quick Reference Panel is open. In the lower left of the footer bar is a + sign. When clicking on the + sign you will be prompted to decide where to put the new Bookmark you are creating. You can use this to add notes or for whatever you desire.

The location of the Default New Bookmarks Folder can be designated in the Project > Project Settings > Special Folder pane.(You can name this folder anything you want and should place outside the Manuscript.)

Elevating Bookmarks in certain Menu commands -
Certain Menu commands will contain a list of your Project’s Bookmarks, among possible destinations listed in the menu’s options. This makes them easier to find and access.
These Menu commands include:
— Edit ▸ Link to Document: Is used to create hyperlinks to documents in your Project. This same Menu command is also available when right-clicking on text in the Editor. (see below) Your options to Link to include a New Link, your Project Bookmarks and finally the ability to navigate to any document inside the Project at the bottom.
— Navigate ▸Go To: Allows you to change the active Editor window to any document in the Binder. (As below will see the Project Bookmarks listed first, then the ability to navigate the Project below this.)
— Navigate ▸Quick Reference: opens a Quick Reference panel to the selected item. (Project Bookmarks are listed first, then the Manuscript below.)
— Right clicking the Editor Icon in the Header Bar includes the option Go To Document.
— Composition Mode includes a Go to option: This menu is structured like the Link to Document menu without the New Link option.


Linking without linking- (Bookmark like)
1. Choose any document/folder(ex link to me)
2. Now create a new blank file and type link to me
3. Select and highlight this phrase
4. Right click on this highlighted phrase and choose the open option and see titles of any file or folders with this phrase. Clicking on these opens the selected file.
Ex. Link to me

Copy a file as an external link
Select a file or folder and Use Edit dropdown to copy document as an external link.

This creates a plain text URL to the location of that file on your computer (ex below) that will function as a Bookmark.
x-scrivener-item://C:/Scrivener Export File/Scrivener_Review_August_2021.scriv?id=531E4075-FC7D-4805-B253-6868155530E9
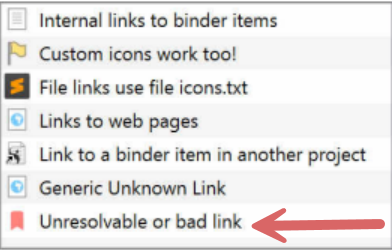
Bookmark Icons for files or folders in the Inspector and their meaning
(Note you will also see these same folder icons in the Bookmark Panel)
Note that any file showing the Bookmark toolbar icon symbol means that the particular Bookmark has a bad (non-functioning) link. This can be caused by a deleted file, a broken web link, or a change in the document’s location in the Project Binder or your computer.