Links Overview Part One
The Link Series
Links are connections to other parts of the same Scrivener Project, another Scrivener Project, a Scapple Project, specific text within a document (Comments/Footnotes), external computer files, links to other program files, or links to information on the web. These come in many forms with different capabilities. Scrivener works best with small chunks of text. Smaller text files, allow precise linking to tag or supply supporting information.
Bookmarks are special links to other documents within the same or another Scrivener Project These can be associated with every document in a Project (if included in Project Bookmarks) or to a single document (Document Bookmarks are unique to a specific file.).
Comments and Footnotes are text links. When clicked on in the Inspector either in a single document or in Scrivenings view, they will take you to a specific text location in a document. They can be used to note or supply information about the purpose of a specific piece of text.
In this series we will concentrate on hyperlinks both internal and external and "Wikilinks" which are words surrounded by brackets and a unique type of link associated with individual words.
Link Facts:
Your Link’s appearance can be changed in the Options Panel under Appearance and Textual Marks.
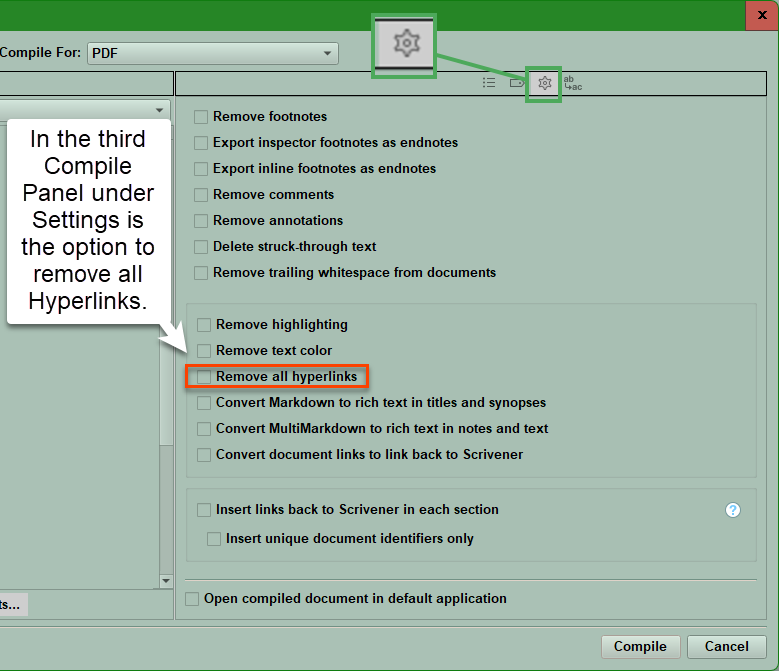
You can remove all hyperlinks in the body of text during the compile process if they are no longer needed. This is in settings pane in the third Compile panel.
If you hover the mouse over any link, you will see the full Binder pathway in a tool tip to that linked file.
You can link to either folders, individual files, or files with subdocuments.
If you drag a file from elsewhere on to a highlighted word(s) this will create a link WITHOUT changing the actual text in Scrivener. This can be very helpful if you use links during the writing process for information and research, but do not need them when compiling the book. Text links can be stripped out while leaving the original text intact during the Compile process by choices you make in the Settings section of the third Compile pane.
Right clicking on a Document Link will display multiple options on how the link can open. The default option is set in the Options Panel under the Behaviors section. Right clicking allows you to customize how a single link will open based on your current work flow. Links can open in the current Editor pane, the other (inactive) Editor pane, as a copyholder, or as a floating Quick Reference panel (which is my preferred choice).
The Right Click option - Edit Link will allow you to edit the Link Target but NOT the name of the Link.
When one or more document links are contained anywhere within the current selection, then you will see a new right click option- Update Document Link(s) to Use Target Titles. This command updates the link text to match the binder titles of the items they respectively link to. This is useful if you want the links in the draft to print a useable title of the document they are linked to. This will update the Target title if this was changed since the link was created. This can be done one at a time or for multiple links in one document at once.
If you only highlight a part of the link, then after editing a hyperlink’s address the original hyperlink could now contain two links inside of it. In effect, creating two adjacent hyperlinks. Make sure the whole hyperlink is selected before editing.
Note the Edit > Undo function will undo the previous act of Removing the Link or any other changes you made and fully restore the former link if you make a mistake.
You can create hyperlinks in Inspector Notes but NOTin the Synopsis.
Any links created within a Comment/Footnote by default will not be underlined. However, this can be changed in the Options panel under Appearance > Textual Marks > Options tab.
The Menu and Right Click commands to remove Links will remove any Link (or even multiple Links) from the selected text. If you only include part of a hyperlink, the remaining portion of the Link will still function.
Links can be removed during the Compile Process. Check the Settings Icon in the third Compile Panel.
External Links CANNOT be added using the Right-Click menu options.
Computer files can be simply dragged or copy and pasted into Scrivener (Remember media limitations of the Manuscript/Draft folder).
Once the link is in Scrivener, it will function as long as any part of the link remains in Scrivener. Partial deletions of a link do not affect its function.
If the files/folders you drag into a new Project contain internal links among those files, they will be preserved in the new Project. If the links refer to files/folders outside of the group dragged into the new Project, then they will be discarded.
How to change a Link’s Appearance?
This is set in the Options panel. File > Options > Appearance > Textual Marks
The Colors tab will allow you to change the global link text and underline color (If you opt to underline links which makes them easier to spot in text).
Depending on your Scrivener theme changing the Link color may be crucial to seeing them easily in your text. I often change Link colors as I change themes.

If you want a much cleaner look and avoid confusion with regular hyperlink formatting, then disable/uncheck the Decorate Comment and Footnote anchors as Links setting. Highlighted Comment/Footnote text will now simply be highlighted with the chosen Comment color or the default Footnote gray and not be underlined. (This is not available to Mac Users)
Hide Markup will hide various Scrivener functions such as links, highlight text boxes, comment and footnote highlights. This will allow a cleaner reading experience in the Editor or Composition Mode. As you can see there are multiple options to choose here. This allows you to decide how much is hidden. Note: Hiding the markup does not remove its functionality.
You can decide whether to underline your links (see the white box above) to make them more distinctive. You can use the theme default color for Links or choose your own to make it more visible.
Link Behaviors
The default way a link opens can be changed in the Options Panel > Behaviors > Document Links.
A Document Link can open in any of the following:
Current Editor
Other Editor
Quick Reference Panel
Copyholder
Using the Options panel and Behaviors > Document Links allows you to choose the default action that happens when you click on a Link and other functional options.

You can make an individual choice on how to open a specific type of link by right clicking on it and choosing a different way to open the link other than the default option. (My default choice is a Quick Reference Panel.)

The Quick Reference Panel option has become my favorite over time, because it leaves me free to continue writing and editing in the original context, but allows a floating panel that can be moved or displayed on another Monitor with the needed information.
The Two Link Types we are discussing in this series of articles are (A.) Internal (Document) Links and (B.) External Links :
A. Internal (Document Links)
Internal Links refer to other files inside your current Project.
How to Create:
Method One:
Use the Menu command Edit > Link to Document
This creates a hyperlink to another Document inside your current Project.

If you click the option New Link above, then this brings up the New Link Panel (see below)
Using the Keyboard Shortcut Ctrl + L will bring up this panel as well.

Method Two-
Dragging Links INTO TEXT or blank spaces in a Document.
If you drop/drag any Binder Document into a blank space in another Document, you will see a Link with the Document’s name underlined in the default link color. You can shorten this link’s text WITHOUT affecting the link’s function.
If drop the link onto highlighted/selected text will see the text change to the project’s Link color and the text will have a color underline. (If you decide to underline Links to increase visibility.) You can shorten the link’s text WITHOUT affecting the link’s function.
However, the downside is you will have your link inside a text field, which does not reflect what document the link is connected with. However, hovering over the text shows the Link path to the document. (Note: Links can be stripped out of your project at the time of Compiling WITHOUT affecting the text they were associated with.)
Links can be created by dragging onto the currently selected word(s) from the:
Binder
Editor by grabbing the icon in the header bar (either side if split).
From Files or Folders in a collection(essentially a collection of binder files/folders)
From the Quick Search Title List

Links CANNOT be:
Created from a link from the icon of a Quick Reference Panel.
Be dropped into the Synopsis. (But can be placed inside Inspector Notes.)
Method Three
Right clicking on a selected word/words and you will see the option of Link to Document.
The Right Click Menu-

You can either create a link to an existing Project Document or even create a new link to a new blank document and place it in the project where you want with this function.
Method four:
Creating and using automatically detected Document Links (Wiki Style Links): Scrivener allows you to link directly to documents in your project by using double brackets around the document’s title.
This must first be enabled under the Options panel > Corrections > Corrections (see below).

To create a new "Wiki Style" document link, follow these steps:
Enter double left brackets-[[
Type in the title of the item you wish to link to
Then close it with a second pair of right brackets-]], as shown below. If the title is an EXACT MATCH (including capitalization), then the link will be created at this point.
If the title does not match an existing document title, then the following window appears when finished with the second right bracket.
A.) You have the option to create a new blank document with the current title which is inside the brackets and this will link to the item you just typed.
B.) Or you can Link to an existing document via using the Panel below.

Once this has been completed, the brackets will be removed.
You can either retype the recently created link to create another document link elsewhere in your project going forward (not retroactive) or copy the link and paste elsewhere. The spelling of the link you are trying to create must match the document title exactly including capitalization to work.
The result will look like any other Internal Hyperlink in your project. If the mouse hovers over this then you will see the full path in your Project to this document.
A "Wikilink" can be placed in Inspector Notes (BUT NOT the Synopsis), Comments/Footnotes (Though you will not see a hyperlink color or line after you create the Link, you will still have a functioning link.), but NOT Custom Metadata with the option of text entry. Entering Information here will not create a "Wikilink".
Quickly Filling in Titles
A natural compliment to this feature is the Menu command Edit > Completions > Complete a Document Title menu command or shortcut (Alt + Shift + =). Type in the first part of a title and leave the cursor in place. Now use the shortcut/or Menu command to give you options to fill in the rest of the title. For Example - type [[Links (and see the possible options to complete the title as shown below).
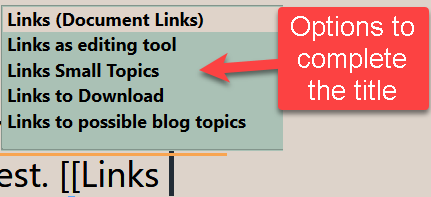
Now select an option from the list then add the final two brackets-]] to complete the Link creation process.
Internal Links are Circular
Whenever you link one project document to another in your binder, you create a Document Bookmark for the item you linked FROM. This is referred to as a backlink. This will display a list of Document Bookmarks which represents every Document linked to the current file you are in.
For example, if you have a character Template for a POV character named Bob, then when you click that Character template every file you have linked to this character template will be listed in the Inspector’s Bookmark pane under Document Bookmarks.
Removing Document Links
Document links can be removed by:
1. Using the Menu command Edit > Remove Link
2. Using the right click menu and choosing Remove Link
Remember, any link(s) falling within the currently selected text will be removed, so there is no need to be precise about what you select. However, if you select only part of a link, just that part of the link will be removed. A small working link fragment will remain.
When you select the whole document text or multiple documents, then many links can be removed at once.
Removing Links when Compiling
You may not want to see links needed to write your project when you output the final product.
There are two places to check.
The first is the Compile panel. Check the third pane on the right under the Settings Icon (#2) and make sure the Remove all Hyperlinks option is checked. (#3).
Note: This does NOT remove links being used as functional features such as page number placeholder, the table of contents, or links that are being used to include images or text.
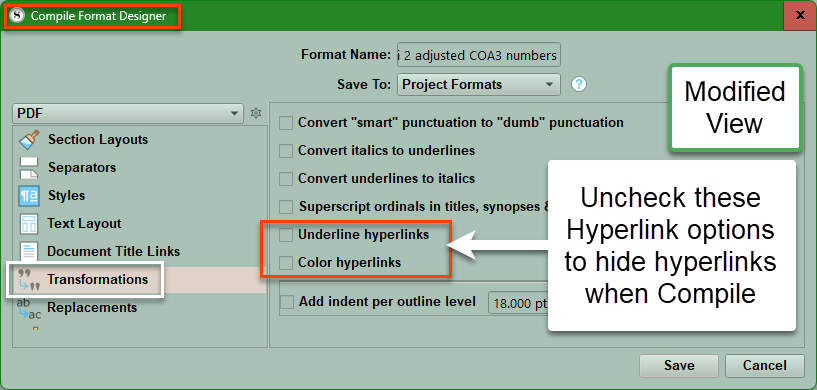
If you are still having issues with unintended retention of Links in the final output, then check in the Compile Format Designer format you are using. Check under the Transformations options to make sure the two Hyperlink options in the red box below are unchecked. If you do not color or underline Hyperlinks, then they will be undetectable when your project is compiled.
Make sure when you make these changes if needed you click the Save button in the lower right to preserve the changes you made.
Using Links during the Compile Process:
Sometimes links can help improve the reading experience by pointing readers to other parts of the book or the internet. (Cross references)
Including Text from other Documents:
Sometimes you may insert the same block/snippet of text again and again in your project. Using placeholders can help you accomplish this. You could paste this in as you go, but if you later want to correct it, then you would have to go and edit everywhere you inserted the text. If you keep a single source file for the block or snippet of text, then editing this updates everywhere this text snippet was inserted.
Creating Textual Links-
These can be used to supply snippets of text, tables, or even whole documents during the Compile process.
There are several approaches to using the <$include> placeholder, each with their own distinct advantages:
Method One:
Specify the document name inside the placeholder-
For the item you wish to include in the placeholder itself: <$include:Item name>. (This must match the document title exactly including capitalization and spacing for this to work). This method is direct and simple, which may be reason enough to use it. There are some advantages with more advanced usage:
When using this placeholder from within compile settings themselves, you will need to use this method.
A downside to be aware of is that you might end up including an unintended document, if there are more than one item in the binder with the exact name you typed in. Ie pick a Unique name/identifier for any document you intend to use this way.
<$include:test page>
Method Two:
Internal Link-Apply a link to the placeholder as a more specific way of designating a binder item.
Type the placeholder into the document where you wish to have the mirrored or cloned text printed. Be sure to select the entire placeholder before dragging a binder document onto the Placeholder.
<$Include>
Note: This placeholder should be on its own line to avoid unnecessary white space when compiling.
Adding an External Link-
Select the placeholder in its entirety (as the target) and use the Menu command Edit > Copy Special > Copy Document as External Link feature to point it at the item you wish to have imported into this spot.
Method Three:
The third possibility is to supply a file system path into the placeholder, which will insert material from plain-text (TXT) or rich text (RTF) files on your disk. This is a very simple process that will not insert images, footnotes or comments.
– Paths can be absolute, meaning the full system path to the file is supplied:<$include:D:\Snippets\filename.rtf>
– Paths can also be made relative to the project’s location on the disk. This example would refer to where a file is in the same folder as the project: <$include:filename.rtf>
– If you are working cross-platform, and wish to compile from both PC and Mac, consider using Replacements to convert your path structure according to which system you are using.
Text Formatting Rules for these uses:
The included text will always use its character styling—even if that means “no style”.
Included text retains its paragraph styling if the placeholder is on its own line. A block quote will remain a block quote when inserted.
The paragraph style will be omitted if the included text is placed within another paragraph. It will however still bring in its own character formatting or styles.
Text (.Txt) files will use whatever formatting they are inserted into.
The Section Type of the source document will be ignored. The inserted text will be treated according to the Section Type of the document it is inserted into.
An exception occurs when placeholders are used from the compile Format settings. In this case the original document’s formatting will be used, including any compile settings that may be applicable to the original item’s Section Type.