Inspector comments overview Part one
Scrivener refers to Comments or Footnotes as Linked Notations.
Comments can serve the same function as annotations, but their placement is different. They’re similar to Word comments in that they show up in boxes in the Inspector’s sidebar, and can be hidden. Their order is based on when they appear in the document(s). These linked notations allow you to jump to the place they occur in a document by merely clicking them no matter the document’s size. Each Comment or Footnote has the title of its file type in the note’s header and footnotes have a fixed color without the option to change.
Linked notes (Comments and Footnotes) are anchored to the highlighted words. Deleting these words will delete the associated Comment.
Inline Annotations notes exist around (outside of) editor text and are not affected if text is deleted.

First, you must select a word(s) to associate with the comment (or footnote). The newly created comment essentially functions as a hyperlink back to the comment and footnote section of the inspector. When you add a comment without selecting a word, the comment becomes attached to the word nearest the cursor’s current position in the active editor window.

You cannot overlap two comments-
Comments function like hyperlinks. If you add a second comment on top of the first it will redirect that to the new comment. If a new comment covers a part of the old one, the result is two comments next to each other. Comments CANNOT overlap each other and function as two separate comments. (see an example below.)

Several settings involving comments/footnotes are found in the options panel and affect how you view comments in the Editor.
Use the Menu command File > Options > Editing > Options (view below is simplified)

If this is checked, then clicking on a comment or footnote will open the Inspector (If it was closed to show the comment.)
If this option is unchecked, then you will still see a small pop up text box with the comment/footnote information when you hover the mouse pointer over the comment/footnote. With this option unchecked, you can edit comments or footnotes inside the Editor alone, WHEN the Inspector is CLOSED. If you right click once on the comment/footnote, then the dialog box appears with the option to either edit the or delete the comment. (see below) If you prefer to view comments and edit in the Inspector, then check the above option. (If you do, then you will not be able to edit a pop-up note or edit from within the Editor.)

Adding Comments/Footnotes:
(Not available in the Final Draft and Fountain formats.)
To add a Comment/footnote you must first:
A. Place your cursor inside the editor window.
B. Highlight a single word or group of words to have these highlighted with your chosen Comment Color. If you do not choose a word then the word nearest the cursor will be highlighted.
Add Comments three ways
1. Click the Comment icon in Inspector header of the Inspector Comment pane to add a comment. If you want to attach this to just one word, then place the cursor inside the word, highlight the whole word, or place the cursor just to the word’s right.
2. Use the Menu command Insert> Comment
3. Use the Keyboard shortcut Shift + F2.
Add Footnotes three ways
1. Click the Footnote icon (cf) in inspector header to add a Footnote[ testing]
2. Use the Menu command Insert> Footnote
3. Use the Keyboard shortcut Shift + F5.
(Note: Inline Annotation can be added by the shortcut- Alt + Shift + F2)

1. Is the Comment/Footnote Icon for the Comment Inspector pane. The * indicates this document has a comment or footnote attached to it.
2. Clicking the Comment icon in the Inspector header will add a Comment. The Color can be customized and the associated word(s) is highlighted.
3. Clicking the Cf in the header creates a Footnote. The footnote has a fixed color and cannot be changed. Depending on your theme the Footnote in the Editor may be hard to see.
Removal of Either
1.) Remove either by highlighting a comment or footnote and then clicking the - sign at the far right of header bar of the inspector . The highlighted comment will have a (theme dependent) faint colored box around it to indicate which comment is active. If you click inside the comment in the editor text this will highlight the comment. Now, clicking the minus sign will remove the comment.
2. ) You can also use the Menu command Edit > Undo to remove the placement of a Comment or Footnote right after it is placed.
3.) Stripping out all notation. Do this by selecting the text you want to remove the comments and footnotes from. Now, use the Menu command Edit > Copy Special > Copy without Comments and Footnotes will allow this copied text to pasted to the currently highlighted text or anywhere else you want.
Navigation thru comments/footnotes (Linked Notes)
Click once to select and double click to edit the Comment or Footnote.
1. Hitting the Ctrl + Enter key will stop editing in the current note and allow using the arrow keys to navigate and affect comments.
2. The up ↑ or down arrows ↓ will move up or down the list in a document or group of documents. This will stop functioning if the focus switches back to the editor window.
3. Using the left or right arrows, will close or expand a comment/footnote. (If several comments have been selected, this command will close or open all the selected comments.
4. Holding the Alt key and clicking a comment/footnote Caret will close or open all the comments/footnotes for a particular note or all the comments for every note in a Scrivenings view.
5. The View ▸Outline ▸Expand All (or keyboard shortcut Alt + ] ) and Close All (Alt + [ ) shortcuts work for groups of comments and footnotes, IF click inside one comment/footnote in the Inspector window, then the above command will open or close all the comments.
6. Hitting the Escape key while in a comment returns you to the Editor text where your cursor had previously been before clicking inside the comment.
Comments (also called Linked Notes) Behaviors
1. Clicking on the highlighted word(s) opens the Comments & Footnotes pane in the Inspector to display the linked comment. (IF THE INSPECTOR IS CLOSED) The chosen comment in the inspector will be highlighted with a subtle box around it with the color chosen by the current theme and may include an underline as well. This option can be changed in the Options panel (see below)
2. Functioning as a link: Clicking once in a comment takes you to the word(s) associated with that comment in the Editor. Clicking twice will allow you to edit the comment/footnote. When you are done editing hitting the Escape key, takes you back inside the document at the right end of the comment with the cursor. (If you hit Ctrl + Return key, then this will stop editing but leave the focus inside the comment pane.) Comments can be decorated with an underline like Links in your project or not. Even if a comment is not underlined, it still functions as a link. (see below)

3. Changing comment colors is as easy as right-clicking (or Control+clicking on a Mac) the comment box and choosing a new color. You could sort comments by color, so you could assign different colors to different types of comments, or even different people if you’re collaborating.

4. Searching Comment Text- Text can be searched for if use the Search In —All (option), though results in comments will not be highlighted.
When in Scrivenings view you will see all the comments for all the documents involved in the Inspector panel in their order of appearance in the Editor. You can decide to use certain colors for different issues. You could have colors for the POV’s, editing, problems, and foreshadowing. When viewing multiple files, then the color of the comment may help focus your search.
If you right click on a comment inside the editor, then you can copy it and paste elsewhere. If you do paste the comment elsewhere an associated comment will appear in the Inspector pane identical to the information in the original comment, including the original date and time.


Note: Comments are links between text and the associated Comment in the Inspector panel and can have an underline to signify this link. The appearance of these can be modified by clicking on the Decorate Comment and Footnote Anchors as links. (File>Option>Appearance>Textual Marks>Options
Without decorating as links a comment looks like below.

With Decorating links it will now look like below.

(MUST also check Underline Links to get this appearance for your comments)
Appearance > Textual Marks > Options

Comment and Footnote Text Font
1. Individual comments can be changed by highlighting text and right clicking and select Font to change size and style.
2. Globally you can change the font for comments and footnotes separately going forward by Using the menu command File > Options > Editing > Formatting. Here you can change both the font type and size. Older comments can be converted to the default font by right clicking and choosing the Convert to Default Formatting option. (You can do this for multiple comments at once by viewing large amounts of text in the Scrivenings view and using the shift key to select from the first to the last comment in this view. Now right click and choose Convert to Default Formatting to change Comments font size in mass.


3. Note: In most cases your Compile setting will handle Footnote formatting for you.
4. The Menu command Edit > Undo commands will work for Comments/Footnotes if you accidentally delete information or the date and time stamp when entering a Comment or Footnote. However, you must be clicked inside the Comment/Footnote pane for this command to work. The Redo function does not work for either.
Footnote Colors
The footnote background can only be adjusted globally in the options panel under Appearance-Textual Marks-Footnotes Background

Inspector Comment Background Area Color
Change in the Options Panel.

Comment Colors
Comments Colors can be any one of six default colors but can be further customized and will be discussed below.

2. Clicking the More option allows more color choices. This is done the same way as the highlighter panel or the color choice panel for text.

If choose the option to Pick Screen Color, then any color anywhere on the computer screen can be chosen as a comment color, including Keyword color chips.
To do this:
1. Open keyword panel to see color chips.
2. Right click on a comment to change the color and choose More.
3. In the Select Color panel (see above) choose Pick Screen Color and place the cursor on a keyword color chip to match a comment color to a particular keyword. (note if you used screen capture software to capture an image of the keyword panel, could use that image to select colors without the Keyword Panel being open.
4. The last color you choose will be used for all future comments across all projects until you change the color.
(see below).
5. In Composition Mode: If you adjust colors of comments when in the composition mode inspector pane, then this will persist when exit composition mode and overrides the current comment appearances in the Inspector.


Changing the color of multiple Comments at once:
You can easily change the color of multiple comments at once by holding the Ctrl key and individually clicking the ones you want to change and then change the color as you would for a single comment.
Or use Shift key to select a range of comments and then change the color as you would for a single comment. Note this DOES NOT AFFECT your footnote color. Thus select the first comment and the last one you want to change and all the comments will change, with the footnotes untouched.
This works for comments across multiple documents in the Scrivenings view as well.
Hide Comment Colors
1. Choose in File > Options in Appearance to check Hide Markup and Comment Highlights

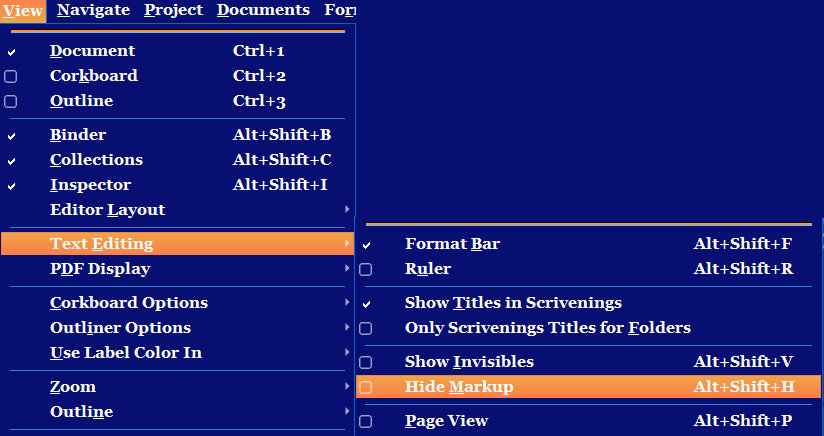
2. Use menu dropdown View > Text editing > Hide Markup (or keyboard shortcut Alt + Shift + H)
Pros:
– Less visibly distracting than annotations.
– Easy to change comment colors.
– All comments for a document can be viewed as a list in the Comments & Footnotes pane.
—All comments and footnotes can be viewed in the Quick Reference Panel by displaying the Comment and Footnote subpanel.
– Easy to search (and narrow by text).
– Can be excluded when compiling (on the Footnotes & Comments tab).
– Can be included during compile if desired. When sent to a Word DOC/X, will import as Word comments if click the option to include comments in the compile output.
— Deleting a comment does not delete the text in the Editor.
— If convert a comment to a footnote, the color will change, but if convert back to a comment, then the original comment color will return.
— Using the Ctrl key or the Shift key you can choose multiple comments to change their color or font at the same time.
— If highlight a word in a comment, then if right click will see your writing tools options at the bottom to look up meanings and synonyms.
Cons:
Requires an extra step to view (though you can point to a highlighted word to see the comment in a text popup).
Not as visible if you prefer high-vis notes; default color choices are easier to miss when scrolling through.
However, more vivid colors might be a little too “in your face” or distracting.
Cannot view all of them at once.
Can not search for by Comment/Footnote color. Color can be used as a visual cue when in a document or documents, but is not included in find by formatting options for comments.
Decorate comment and footnote anchors as links:
When enabled, highlighted text for inspector comments and footnotes will also take on all of the appearance settings for links including an underline as well.
When disabled, the text within the highlight will appear as normal text instead, but is still linked to its comment.
Using Comment Colors as a Revision/Editing Tool
You can use Comment Colors to represent specific issues and in Scrivenings view you will see all the Comments stacked. Clicking on one takes you to that point in the text. Using specific default colors to represent issues allows a quick way to isolate and concentrate on specific issues at once
The default colors are listed below with a possible sample Comment Key you could use.
Comment Key
Red- Character Revisions/problems
Orange- Spelling and Grammar issues
Yellow- Could be Forshadowing
Green- Setting and Worldbuiding
Blue- Plot Revisions
Purple- Dialog Issues
Decorate comment and footnote anchors as links:
When enabled, highlighted text for inspector comments and footnotes will also take on all of the appearance settings of HYPERLINKS including an underline as well. (This is found in the Options Panel under Appearance and Textual Marks options (see below)

When disabled, the text within will be normal text highlighted with the current Comment color instead. With either option the highlighted text is still linked to its comment.
Comments in Composition Mode
These are visible in Composition as a simplified floating Inspector Panel with a Comment section. You use the small Inspector icon in the footer bar.
