The Inspector’s Synopsis and Notes section

Synopsis and Notes
The Synopsis is intended to be a brief description of the document’s purpose (which makes it easier to locate the desired files in the Corkboard or Outliner group views).
A.) Synopsis Section
The Synopsis views in the Inspector


The Index Cards on the Corkboard.


Note: you cannot change the display on the Index Card in Corkboard view, this must be done in the Inspector.
Grey text in the Index card means the document does not have a Synopsis and so the first few lines of text in the document are shown instead. (see below)

Outliner view of the Synopsis being displayed with the title.

Image vs Text
Text View The amount of text displayed from the Synopsis on the Index card will be based on the card size. If not all the text is displayed on the Index card, then you will see 3 dots after the last visible word… which indicates more information remains in the Inspector Synopsis window.)
Image View On the right of the header is a picture icon (see above) and clicking this allows you to add an image to the Synopsis by a simple drag and drop. This will then display in the Inspector view and Index Card on the Corkboard.
Adjusting the Image
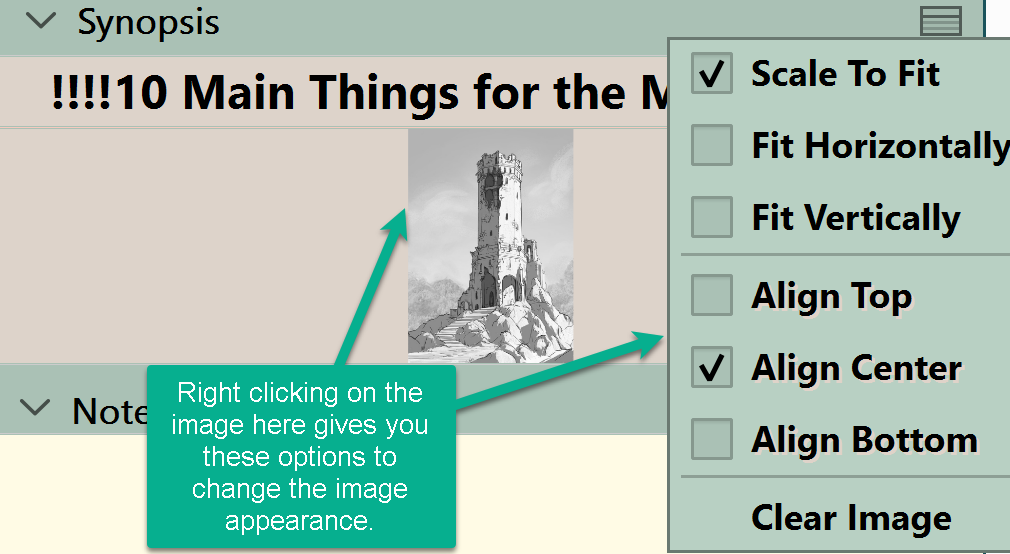
Right-clicking on the Image brings up the options shown above and explained below.
These adjustments also impact the way the images will be displayed on the corkboard:
Scale to Fit
The longest edge of the image will be sized so that it fits within the shape of the index card in the inspector, thus showing the entire image.
Fit Horizontally The width of the image is sized to fit the width of the synopsis image area. This may mean portions of the image are cropped along the height.
Fit Vertically Likewise as above, only the height of the image will take priority.
Align Top/Left When fitting the image horizontally or vertically, you can choose to pin the image to the top edge of left and crop the bottom or right.
Align Center This is the default setting, both the top and bottom or left and right (depending upon cropping) will be trimmed.
Align Bottom/Right As with aligning top/left, this will crop the top or left of the image off as need be.
At bottom is option to clear image as well.
The Synopsis Card will reflect the label color for the corresponding text or folder file only iF you have activated the index card color option. You do this by checking the option in View > Use Label color in >Index Cards (See Below).
Double Clicking in the Synopsis area to edit the information there. This includes both the title (changes here will affect the Editor and Binder.) and the text of the Synopsis. Click outside the card to end editing the Synopsis.
Keyboard shortcuts Windows key + Alt + H focuses on Notes and same command but with I focuses on the Synopsis section, when the Inspector is open.
The first line in the Synopsis is the title of the file/folder.
Synopsis Notes Appearance can be adjusted in File > Options >Appearance > Index Cards
NOTE to see lines in the Synopsis Card, you need to check the show text lines option for index cards for lines to appear on the synopsis cards as well. (see below)

You can close the synopsis card area using the down caret. (see below)


Important Synopsis Facts:
The Appearance of the Synopsis Section background and the Index card appearance are linked and will display Label colors of the document. However, the Synopsis section is simplified and will not include Status Stamps, Label Strips, or Keywords as these can be found elsewhere in the Inspector.
You can enter a line break in the Inspector Synopsis body, the Index card body, or the Outliner entry by clicking the Ctrl + Enter (return key) keys.
The Synopsis tab has two parts. The upper section can contain a text summary of the document or show an image. This information is also displayed in the Corkboard View on the “index card” and in the Outliner view as text only if click the option to include with Synopsis.
Below the synopsis card is the Note Section. Here is an area where you can jot down notes pertaining to the document itself. This area will also display information from bookmarks and snapshots if you open these from within the document’s Inspector. You can even have document templates prepopulated with information or questions which are displayed in your note section. These could be questions to help you properly develop your scene, or a checklist to complete as you write.
The note and Synopsis area can be searched separately or both will be included if you choose the All option when using the Project Search function.
The divider between the Synopsis and Notes and between the Notes and the Editor can be dragged to change panel sizes.
**The text synopsis will not be erased if you opt to use an image in the Synopsis, and in fact will still appear in the outliner if you choose to display an image in the Synopsis. In the Image view, search results and places where the synopsis might be exported as text will still function.
**Likewise, the image will remain stored even if you switch back to text view.
Clearing an Image does not affect the text in the synopsis card.
Using the Menu command Documents > Autofill gives two options:
A.) First is to automatically fill the Synopsis with words from the document’s main text.
B.) You can choose to append the Synopsis to the main text visible in the Editor window.
Whether the Synopsis is shown with the title in the Outliner is an option, you must check if you wish to display this.
***When you split a document both the Synopsis and Note content stay BUT ONLY with the top half of the split document.
Keyboard Commands:
The Keyboard command Ctrl + 7 will switch the synopsis area between the text and image modes.
The Keyboard command Windows Key + ALT + U will reveal the Inspector Notes tab if not visible and focus on this.
The Keyboard command Windows Key + ALT + I will reveal the Inspector Synopsis tab if not visible and focus on this. Doing this a second time places the cursor inside the Synopsis area.
Uses for the Synopsis and Notes fields:
Information in the Synopsis field can give a quick summary or insight into a document in the Corkboard or Outliner views.
The Notes section is a suitable place to copy and paste text from the main editor, if you wish to set aside passages you aren’t sure about. Document notes are exclusively available to the current document ((being currently viewed)) in the sense that you cannot view them unless you are inspecting their associated document.
The Notes Section can also include comments or ideas to explore when editing a novel, or highlight percieved issues.
The Notes section can be prepopulated with questions for Scene developement using templates.
Synopsis and Notes can both be exported as an option when exporting binder items as files , and as part of a compile format’s Section Layouts.
The Binder Default Icons

An empty text document

A Synopsis has been added to the document, but the editor has no text in it.

The folder has a Synopsis added for it.
Outliner Appearance
In the Outliner, documents will use a bolder title by default, with the synopses in a smaller and slightly grayer font. If the item lacks a title, the area where the title would normally be printed will be collapsed and just the synopsis will be shown. Colors are set in the Options Panel > Appearance > Outliner > Colors

1. The File title will be bold text by default.
2. The body of the synopsis text will be less prominent and the color can be adjusted in the Options Panel (see above)
3. Folder titles can be a different color than file titles.
Composition Mode
You can adjust the Synopsis background independent of the normal inspector background via the Options Panel > Appearance > Composition Mode > Colors > Synopsis Background.
Auto-Filling Synopsis Text (3 ways)
If you would prefer to use an excerpt from the main text area in the Synopsis, then there are three ways to go about doing so:
1. Select some text in the main editor and use the Documents ▸Auto-Fill ▸Set Synopsis from Main Text menu command (Windows key + Alt + Shift + I) to fill the synopsis with that text.
2. Conversely, if you want to first block out some ideas on the corkboard and then later dump those ideas into the main text editor for further development, use the Documents ▸Auto-Fill ▸Send Synopsis to Main Text command to append the synopses of all selected cards to their respective main text content.
3. Drag and drop text to or from the synopsis text area to add it at the drop location—just as with any text editing area.
Document Notes (are plain text, editor RTF text so can do more special effects)
Formatting Inspector Notes
The default formatting used for notes in the Notes container (below the Synopsis container) is set by the using the Menu command File > Options > Editing > Formatting. The default setting hear is considered by Scrivener to be the default (and thus considered No Style).
If you set the font there, you’ll be limited to adjusting only the font itself. However, within the Notes container, you can make additional limited adjustments, such as line spacing, by selecting the text and using the format toolbar.
For and individual Inspector note you can click inside the Note and use Ctrl + A to select all the current text and then use the Font Toolbar to change the font, add bold, italicize, or other options.
To customize it further, you can also apply the formatting from other text. Select a section of your main text with your preferred settings (e.g., 1.0 spacing with a .25 indent), go to Format • Copy Format, then select the text in the Notes container and go to Format • Paste Format.
Alternatively, you can create a special Note Formatting which can be named Inspector Notes Style and be used whenever you want on a specific look in the note section. Having a set style makes this easier to apply going forward or changing any existing Inspector Notes where you might want to change the appearance.
Inspector Note Facts:
Document notes are notes associated with a specific document, but not a specific point in the document. So, if you had an idea for a change in character motivation in the scene, you need more research on a topic in order to write or revise the document, or you want to create a quick outline of the scene or article you’re writing, document notes are a good choice. They can function as a scratchpad for ideas for the particular document.
These notes only appear when you select a document and are found in the Notes section of the Inspector pane. To view or edit them anytime, select the desired document in the Binder, make sure the Inspector is showing (if not, click the blue “i” button in the toolbar), and click the Notes button at the top.
You can right click on highlighted text in the Notes panel to change color or style
You can import multiple images into the note section
Can copy and paste text into notes from the editor or any other source.
Templates can have text in the Inspector note section as part of the template. If copy the file as part of template the duplicated file will contain copied information in note section as well.
The “Notes” section in the lower half of this first Inspector tab is a small but near-fully capable rich text editor (much like the main text editor you do your principal writing within). You can use most formatting features, embed images, use lists, tables, bookmark links, and most other things you might need. If a document has notes or a synopsis then there will be a star above the Note symbol in the inspector icon bar.
Enlarge or Shrink note font by using the mouse wheel and Ctrl key.
You will only ever see these notes while working with or selecting the item in the editor. You can use most formatting features within this field, even styles.
You can create or store hyperlinks within the Notes section.
When merge documents then the inspector notes and synopses of merged documents will always be separated by a new double line.
You can close the notes window by clicking the down Caret and this will expand the synopsis area.