Using the quick search function
The Quick Search tool helps you find something quickly in your project if you need to add a comment, note, or annotation without doing a full Project Search. This bridges that gap.
Quick Search Facts:
1. You can only search titles, synopses, or text (with a little surrounding context)
2. The search will occur using the "Exact Phrase" operator.
3. This is front and center in the main toolbar.
4. By default, it displays the name of the current file/folder you are in. (see below)
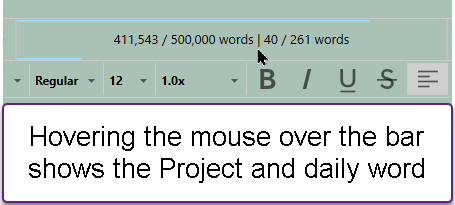
5. Hovering the mouse over the Quick Search Toolbar will show the word targets. (see below)

6. If you hover over the title of a search result, then you will see the location in the binder displayed below the mouse. (see below)

7. You can use the up and down arrow keys to move up and down the Quick Search Bar results to find what you want.
8. You are limited to the first 10 search results in any one category using this tool. ( If you need more results, then use the Project Search.)
9. At the end of the Quick Search Results is the option to click Project Search. Doing so will put the Quick Search search term inside the Project Search Window and allow you to conduct a full Project Search if you did not find what you wanted.
10. Holding the alt key and clicking inside the search bar will bring up the Project Target Panel.
11. Any results in the quick search list can be dragged and dropped elsewhere in the project, just as you can with Binder items.
12. The text find tool (Menu command Edit ▸ Find ▸ Find…) will now match the Quick Search term, meaning you can use the keyboard shortcut F3 to walk through your search results (unless you have changed this keyboard shortcut for another reason).
You can open a Quick Search by:
1. Clicking inside the quick search window itself
2. Using the Menu command Edit > Find > Quick Search
3. Using the Keyboard shortcut Windows key + Ctrl + G which makes the Quick Search Window active and pressing enter will rerun your last quick search again.
The list will be categorized with up to three sections of results in the order below with titles first:

1. Titles:
Prioritized by titles that match what you’ve typed in, or that begin with the text you have typed. E.g. if you type in “Research”, you will find it near the top even if there are hundreds of files above it that use that word in their names (unless of course you have hundreds of documents named “Research”, but then this probably isn’t the best tool for the job!). [If you hover over the title you will see the Binder location of the document displayed below the mouse.]
2. Synopses:
Exact phrases found within hand-crafted synopses (as opposed to preview text generated in such places as the corkboard) will appear listed below the titles results.
3. Text:
Any documents containing the EXACT phrase you have typed, will be listed here with a little context text around the phrase printed for a reference. [Again, if you hover over the text, then the path to the document will be in a highlight box below the text]. When viewing a result from the text based section, then you will go to the FIRST document that exactly matches your search criteria and scroll to that text.
4. Full Project Search:
At the bottom is the option to use that search term and run a full project search with it, if you are not satisfied with the Quick Search results. Clicking this will put your search term in the Project Search window and launch the Project Search and show results.
Quick Search Limits:
You will only be able to view the first 10 instances of your search results in text/titles/synopsis. (If you need more than this you will need to go to a full project search)
Viewing your Quick Search results:
1. Right clicking on a quick search result will load it directly into the active Editor window.
2. Or you can press the Return/Enter key to achieve the same result.
3. Holding the shift key and then pressing the Return/Enter key will open the currently highlighted file in the Quick Search list in a Quick Reference Panel.
4. Holding the alt key and then pressing the Return/Enter key will open the currently highlighted file in the other editor window or create a split editor view if needed. The original open editor window will retain the active focus. Using this method you can view material from the Quick Search while maintaining the active focus on the Current Document to allow comparisons of information.
5. You can use the up and down arrow keys on the keyboard to quickly cycle thru results even across categories.
The Quick Search Bar appearance:
The Quick Search Bar Shows
1. A Title-Your default view shows the title of the currently viewed document in the header. If the editor is displaying a split view, then the quick search bar shows the title of the currently active document.
2. Project Targets-Hovering over the bar shows both the current number of words in the Draft folder (#1 below) and your Draft Target (#2). A vertical line (#3) separates this from numbers showing the words you have written in the current daily session (#4), followed by your Session Target (#5). The Draft folder progress is on the left and the Session count on the right.

Note: If you hold the alt key and click in the search bar, then this will bring up the Project Target Panel. (Here is where you can set your project targets and Session Targets. (Must click the Options button and set a date to finish your project to have a Session Target number.)

If you have set target and session targets, then you will see color bar on top showing project target progress and daily session progress will show in bar on bottom.
NOTE: You have the option to disable displaying the progress bars in the quick search window if this is distracting by unchecking boxes in the Options Panel under Appearance. You can also change the colors that show your progress in the Options Panel as well.

NOTE: If you set your Project targets to pages rather than words, then you will only see session target numbers in the quick search window and not the total production and progress.

All Scrivener Projects start with the Quick Search Bar visible in the Main Toolbar, but you can edit the t0olbar and remove this.
In the case where you removed this from the toolbar, then use the keyboard shortcut to bring this up as a floating window. (Windows Key + Ctrl + G)