Scrivener’s project Search options part two
The nuts and bolts of the Project Search Options:
1. Search In:
This is where you choose what area of the Scrivener Project you will be searching in or what Metadata you will be using to search your project with. Normally the Search In area will only allow one option at one time, BUT you can choose MORE THAN one search parameter to search with (You can choose more that one in the mac as well) , including multiple custom metadata entries.
You can add additional Search In options one at a time using the method below.
Before you click the magnifying glass to open the search menu:
1. HOLD the alt key first
2. Then left click the magnifying glass to display the Search criteria.
3. Now click an additional option in the Search in field. The search menu will close. When you open the Project Search again, you will see the extra entry added to the Search In options.
4. Repeat this process to add one additional parameter per turn. (see below)
Now you will see multiple items checked to use as parameters for the Search In function.
To return to using a single element, either select “All”, or select any single element without using the Alt key.

1. Search In Options Include (All results here are affected by your choices in the Operator and Options sections of the Search Panel):
All- The default setting which will search every element in the Scrivener Project which includes text including the Inspector’s synopsis, notes, text based custom metadata, footnotes, and comments for the word(s) or phrase currently in your project search box.
Title- Will search both folders and files in the Binder for title text matching the word or phrase in the project search box.
Text- Text within documents in the Binder will be searched. However, this option excludes the Inspector’s Synopsis, Notes, Footnotes, and Comments.
Notes- Searches the text within Inspector notes only.
Synopsis- The synopsis field for each document will be searched including anything that has been typed into the text area of an index card or in the synopsis portion of the outliner. However, this does NOT include the text automatically generated for any corkboard document without a synopsis. A neat Trick: If you use * (the wildcard symbol) in the search bar and choose to search in the Synopsis only, then results will return any files that contain any information in the Synopsis field which is not due to the automatic population by the Index Card. So, you will return items only where a synopsis entry was typed into the Inspector.
Keywords- Any Keyword list you have created will be searched and files with the chosen assigned keyword or keywords will be found.
Option A. If you want to search for files only containing every keyword in a group of keywords separated by spaces or commas then use chosen, then list several keywords with a space or a comma, then use the Operator option of All Words.
Option B. If you do the same method as above, but change the Operator option to Any Word, then a list of documents containing any one of the keywords listed will be generated.
Label- If you have created labels, this search will return all documents associated with the label text (not its color) in the search window. As with keywords you can search for multiple label values at once.
Status- If assigned, then this will return all files with a status with the selected text in the search field. The Status values are defined/created in the Project Settings panel.
Section Type- If you have assigned these manually or by default, then searching for Section Types makes it easy to see if Scenes, Chapters, Acts, Front Matter, and Back Matter are correctly assigned. Note you can create unique Section Types that can function like a Status. You could create a Research Section Type, or Character Sheet Section Type.
Note: A bug limits the search of Section Types to the Exact phrase (ie name of the Section Type) regardless of what Operator you may use.
Custom Metadata- Each specific data entry in this category will be listed as a separate search option. (Again, using the method discussed with keywords above, this can also be used to search for multiple Custom Metadata entries at once.)
For searches involving a Custom Metadata item with a Checkbox-
Using “yes”, “true” or “1” in the search window will find all items that have been checked.
Using “no”, “false” or “0” will return those items that have not been checked.
Custom Metadata Lists-
These work just like the status and label elements do, using regular text searches to find which items match the text you’ve typed in.
Custom Metadata Date Searches-
Search text for any part of a date as text. For example, “04” would return items set to April, but it would also find items set to the 4th day of any month. You can type in more of the date to be more precise, such as “2017–04” to weed out those using the 4th day.
2. Operator Search Options include:
Your choices here control how the words listed in the search window will be used in the search. You may only choose ONE method to use in this section for a single search.
The Operator Category works while your search is active and stops when you return to the binder.
This setting affects the scope of the search. The options available include:
Any word- This default option returns documents containing at least one of the words typed into the search box. (A list of words must be separated by a space or a comma to be searchable.)
Note: This type of search will reveal the search word even if it is part of another word. For example, search will highlight the word search inside the word research.
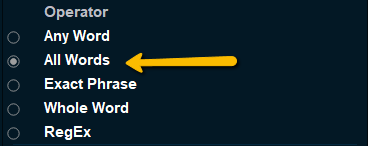
*****All words- This option returns ONLY documents containing every word entered into the search field. Mixing words with double quoted phrases works as well. The order of the words has no influence on the result. The phrase "black car" with quotes will have Scrivener search as though the phrase inside the double quotes is one word.
Note: If you want to search for two characters at the same time then enter their names separated by a space (or a comma) to search for them. Ex.-Angela Bill(separated by space). With this operator active, then only documents containing both names will be selected. This can also be different object types such as names and objects separated by a space/comma as well.
Remember, putting quotes around a phrase causes the Scrivener Search engine to treat the phrase as a single word. Ex. Searching for the quoted phrase "black car" would treat this as a single word and only show documents containing the phrase black car and not documents with just the word black or car alone.
Exact phrase- Only documents with the words precisely as typed (A total Match) will be returned by this type of search. The order of the words used is now important. If the words are a subset of a phrase, Scrivener will also return that phrase. A search for the phrase "the book" will not return results for book, or book the, but will flag "the books" (the plural form) or "the bookworm" because within this phrase you find the entire phrase "the book".
Whole word- Scrivener will return documents containing the whole word only, BUT nothing if the word is a subset of your search phrase or word. If you choose to search for boat with this option, then boats would not turn up on this search. Using this type of search, you must match the word exactly to obtain results.
Reg EX- (will be discussed in another topic on its own)
3. Options
The Options section instructs the search engine on additional options of where or where not to search. You can choose multiple options in this section.

Most of the categories are self explanatory.
Search Binder Selection Only- Only searches the currently selected Binder documents. You can do this for a collection as well by choosing the collection, then use Ctrl + A to select all the files or a smaller group within the collection.)
NOTE: If your search criteria is ONLY the Search Binder Selection, then you cannot save this search as a collection. The option is grayed out on purpose as this type of collection could be a single file or small group and thus unlikely to be a productive search collection.

Other ways to narrow your search criteria include can be used by checking the box to:
Check the Box to search the Draft Folder or (current) Binder Selection (highlighted documents) only.
Exclude Templates and Trash Folders. Generally, these will not be helpful if searching the Manuscript/Draft folder. This option excludes Templates and any documents in the Trash folder.
Included documents are those which are currently set to be compiled.
Excluded documents are documents are those currently not set to be compiled.
If you check both, then the compile status is ignored for this search.
Case Sensitive: By default, the search engine ignores a search term letter case (ie Capitalized or not). If you need to search for proper nouns and are getting a lot of false positives, this option can help.
Invert Results: All of those items that do not match the current search criteria will be listed. For example, if you search for the label, “Blue”, then only items not marked with the blue label will appear. This can also be used to find documents not containing a certain keyword or piece of metadata.
Reset Search Options: Restores search settings to the original simple search parameters.
Which are:
Search in: All
Operator: Any Word
Options: all disabled, save for the two toggles to search for both “included” and “excluded” documents.

Saving Searches to use again:
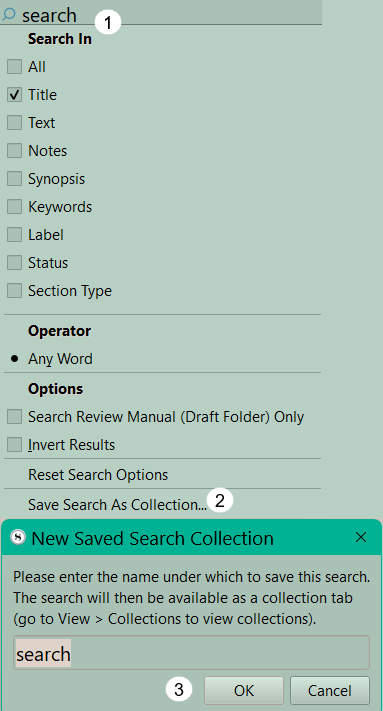
Save Search as Collection…: This allows you to save your search results as a Dynamic Collection. Every time this is clicked the Search will run again using the previously set search criteria and generate an updated list of search results. Dynamic collections cannot be edited.
1. Left click on magnifying glass icon.
2. At the bottom of the options that appear is the Save Search as Collection.
3. Keep the current name or change it and click ok. This preserves the current search as a Dynamic Collection. Choosing this search uses the criteria you chose to search your project every time you click this collection. (see the modified image below)
Use the Menu command Navigation > Collections > Convert to Standard (Static) Collection to change a Dynamic Collection such as one created from Search Results into a Static one. When this is done the magnifying glass in the right corner of the Header changes to a negative sign.
Updating Saved Search Criteria-
1. Load a Dynamic Search by clicking on the Search tab of the Dynamic Collection.
2. The current search criteria are loaded, but you can change them here to modify the current Dynamic Collection. Your changes will be automatically changed for the current the Dynamic Collection. Note: a Windows bug will change the search terms will modify the search name.
Note the Menu allows you to reach all your other possible search methods via the Menu command Edit > Find >
See your options below:

Searching isn’t solely for reading and editing.
You can decide to use your search results to drop entry results elsewhere in the project (for research or reference) by dragging icons into the Binder or inside folders elsewhere.
You can also add these results into Project Bookmarks, Document Bookmarks, or onto a Link page to use as a resource reference. You can simply drag the icon of the currently viewed search result to where you want to make new Bookmarks or Links.
How to find the Word count of the documents in your Search Results and the number of Documents in your Search Results.
Using the Outliner to count search results:
1. For any Search, choose Ctrl + A to choose all the results and then place these files in the Outliner view.
2. Make sure you have chosen to display total word count as a visible column in the Outliner.
(Note: to get an accurate count, you must make sure the Outliner is fully expanded and all subdocuments are displayed.)
3. In the Footer bar, you will see the total number of items in the current Outliner View. IE the total number of the files from your current search after clicking inside the Outliner View. So you could use this method to find out how many scenes a POV character is in as well as how many words in your story are devoted to the POV. If this number is not displayed in the footer click on any item in the Outliner to see the total number of documents selected in the Outliner footer.
To see a word count for a folder (chapter of a novel), you must be fully expanded and be one step above in the tree hierarchy to see the folder displayed with its word count.
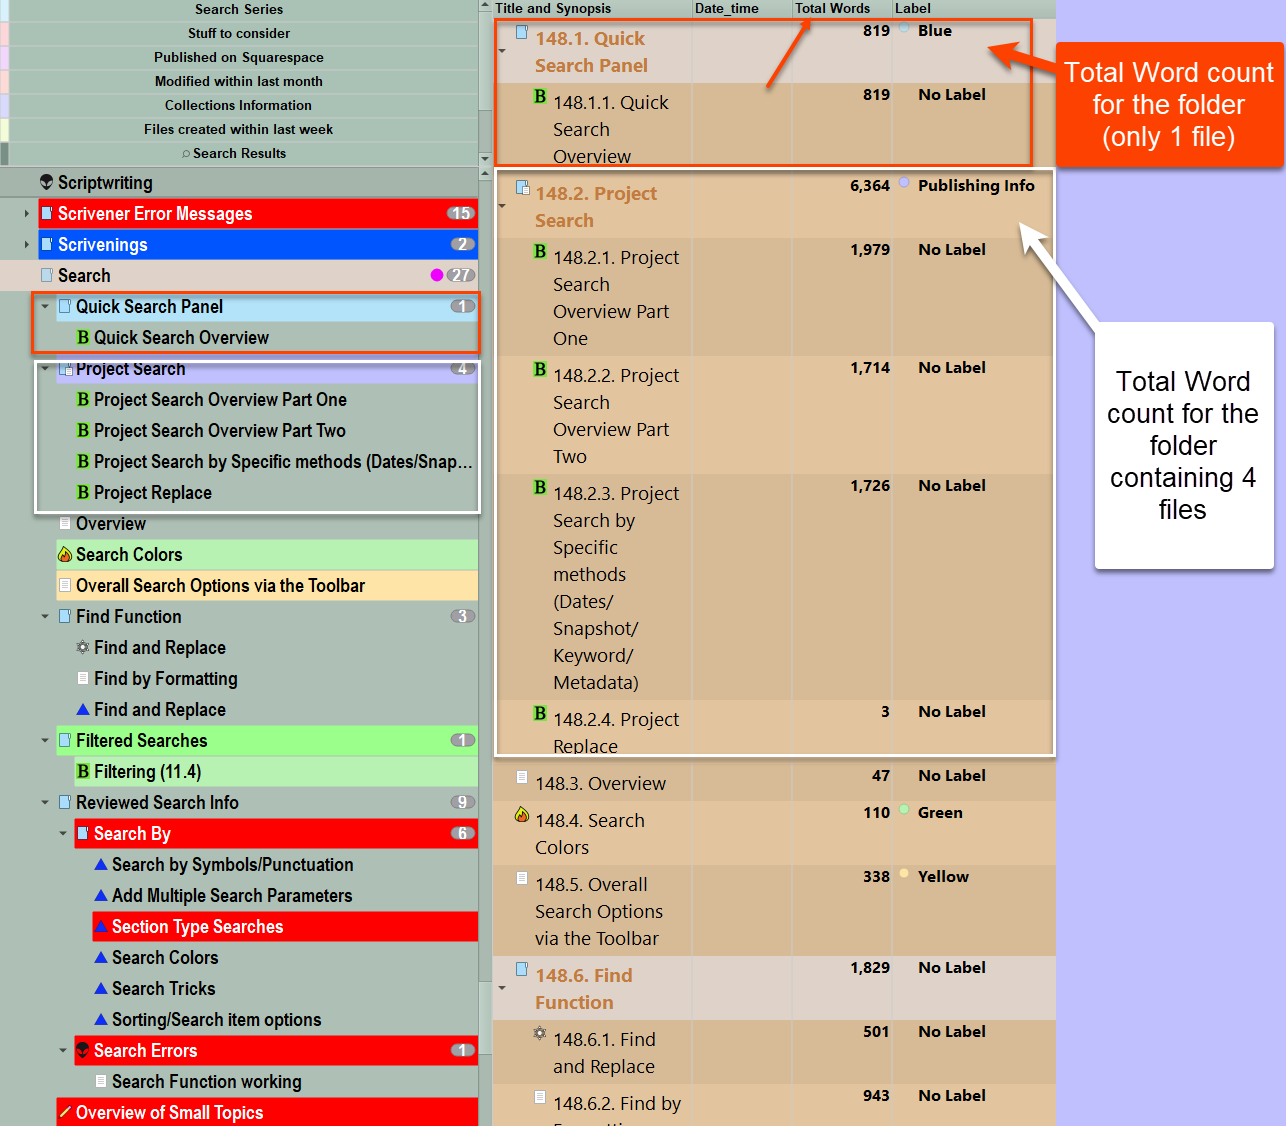
You could use this method to count how many documents have a certain status like done, or need work. Or how many have certain keywords, etc. In this view the number of items displayed in the Outliner are counted in the footer bar. The count will include documents inside closed folders in the Outliner.
Using the Scrivening view to count the number of total words in your search results:
Here you only need to select the files you are interested in view in the Scrivenings view to see the total word count in the middle of the editor footer. Thus, it is easy to see the word count for a chapter, Act or Search this way.
For a Search, you do the search and select all (Click inside the search and use Ctrl + A to select all) or manually select some of the Search results. Now, click the Group Icon in the main Toolbar to get a group view of the Search. In the Scrivening view, the total word count will be in the middle of the footer.

This method can also be used for a collection. If for example, you made a collection of all your scenes in Act I then open the collection and used Ctrl + A to choose all the files, you would go to Scrivenings view and generate a word count just as in the above image.
Using Project Statistics with a group of Selected Documents.
Scrivener will generate detailed word counts and other information on the current files highlighted in the Binder. If you use the Selected Documents Panel of Project Statistics you will see detailed statistics on these selected documents in this panel. The Options panel has many settings that should be reviewed to ensure you get accurate results. (Do you only want documents counted if they will be compiled? Are you counting subdocuments? Do you want to count footnotes and comments?)
Occasionally, there may be small discrepancies in the word count compared to using the Scrivenings view to count a group of documents.

Note: The detailed statistical information in the Selected Document’s Panel is also available by clicking on the word count in the middle of the editor footer. (see below)

Reg Ex Searches have their own special syntax and will not be discussed here. If you are having problems finding the right Reg Ex search syntax to find what you want, consider asking ChatGPT/or another AI to see if they can give you a functional formula.
Your Search results Search Colors:
The Find highlight color and the Project Search highlighting color are intentionally different by default and BEHAVE differently. Feel free to change them in the File > Options > Appearance > Textual Marks > Colors options tab. The terminology is “Search Results Highlight” (#3) for Project Search results and “Find Results Highlight” (#1) for the Find results temporary highlighting.

FIND RESULTS COLORS:
The Find highlight colors rotate thru several different colors beginning with as the Alternate Highlight color (#2 above) first AND the Current Line Highlight color (you choose in the Editor Appearance options) then the Find results color (#1 above) replaces this with the Current Line Highlight color. The Editor Current Line highlight disappears when the Editor’s Text selection color replaces the Find results color. This color is set in Options > Appearance > Main Editor > Colors > Text selection color. This color will remain until you move on.
So any results are shown with three colors groups. The first is Find Results Alternate Highlight (color) + Editor Current Line Color, then the Find Results Highlight (color) + Editor Current Line Color, and finally the Text Selection Background (color) WITHOUT the Editor’s Current Line Highlight Color, which will persist until you move on. Make sure you choose colors that are easily visible based on your theme.
If you want to change a color, then click on the color square (#4) and choose another color. Use Default Color (#5) will go back to the original colors used in the theme. When done, click the Apply button (#6).
PROJECT SEARCH RESULTS COLORS:
Both the Project Search and Quick Search use the same highlight color.
With either search the results are ALL highlighted at once in any given document or documents (with the Scrivenings View). No Current Line Highlight Color appears in this situation.
