keywords overview part 2
Organizing Keywords
The Project Keywords Panel is a freeform work space where you can organize your Keywords into groups and arrange them sequentially, by topic or however you see fit.
To change the order of Keywords within the list, use drag and drop.
You have the option of organizing in alphabetical order by clicking the A-Z box in the middle of the bottom of the keyboard pane if the alphabetical order is reversed this box is checked. (Note- this does effect subfolders as well)
You can also drag any Keyword onto any other Keyword to nest Keywords.(See below).

Hold the Alt key down whilst dragging to drag not only the Keyword but also any parent Keyword(s) under which it is grouped. (In this example, Locations and Assign this one would also be included as parent Keywords.)
You can also highlight multiple Keywords at one time and drag them into the Inspector Metadata pane for a file or folder to associate them with that file or folder. You can also delete multiple Keywords at the same time by highlighting several and hitting the - sign.
However, you cannot drag a folder from the Keyword panel into the inspector window. Only the Folder’s name itself will be dragged over not the contents Unless you use the alt key when highlighting then if you pick a Keyword in that folder all the parent folders above it will be dragged in as well.
With the Keyword Panel open you can drag Keywords into multiple different files/folders without opening them just by dragging the Keyword(s) into that file or folder.
Removing Keywords
If you want to Remove project Keywords from several files at once use the Keyword Panel. First highlight the folders that you want to remove the Keywords from then you will click on the 3 dots… And see the option to remove Keywords (see below)


Removing active Keywords will trigger the warning above.
Changing Keywords Globally (will change across whole project)
Intuitively, it makes sense, if you change the name of a Keyword from the Project Keywords Panel it will be altered throughout the entire project rather than becoming a new Keyword that nothing is assigned to.
To do either, first use the Project ▸Show Project Keywords menu command to load the Keywords Panel.
To change the name of a Keyword: Double-click on the name of it in the Panel and edit.
Then, Click elsewhere to confirm your change. [This is useful if you change a character’s name in the middle of a project.The changed Keyword is still associated the previous Keywords in your project.]
Likewise, changing the color is a global setting.
To modify the color assigned to a Keyword:
1. Double-click the color chip itself from inside the Keyword Panel.
2. This will bring up the standard color chooser.
3. Close this Panel when you are done and the Keyword will have a new color across the project.

Deleting Keywords globally
Deleting a Keyword from the Entire Project, must be done from the Project Keyword Panel.
Use the Project Keywords Panel:
1. Open Project ▸Show Project Keywords (or Keyboard shortcut Windows key + Shift + K).
2. Select the Keyword(s) you wish to remove. You can select multiple Keywords with the Shift and Ctrl keys.
3. Click the − button in the footer bar. For Keywords that were not assigned to any items in the binder, this will be done silently and without confirmation.
(If a Keyword is currently in use, then you will be warned and asked to confirm the removal.)
Exporting and Importing Keywords
This is simple to do between two projects. First you must have both projects open and their Keyword Panels must be open as well. Once this is done you simply drag a Keyword or multiple Keywords from one Panel to the other. The Keyword name and color will be preserved.

Searching with Keywords
To Search Keywords Via Search from the Keyword Panel footer (see below)
1.) The Main Search occurs using the Search Toolbar Icon. The search will be done by the parameters you have set in the Project Search Window.
2.) Choose Parameters
A. Choose Keywords ONLY ( Note if you hold the Alt key you can click multiple items to be searched for such as Keywords and Labels in the Project Search window.)
B. Look at Operator to further refine your search. Choose Any Word (Any of multiple Keywords in the search is acceptable), OR All Words (Only find files containing all the Keywords in the search. You must separate each Keyword by a space or a comma.)

C. Choose Options of where to search such as included or excluded documents.

This is very useful if you are building a novel to see how many chapters contain various characters, themes, or locations, for example
To Search Keywords via the Keyword Panel
Steps
1. Open Keyword Panel and click on magnifying glass in right side of footer. And choose one or multiple Keywords and then choose search options.(see below) Note: you can only choose one option.

In the Binder you will see the search results generated from the Keyword Panel search. (If choose multiple Keywords then will only see files containing all of them in the search or any of them based on the Operator option you chose. (See above).)
2. You can choose to Search all content this will supercede any limits in the Project Search Window.
3. Choose search option you want, including to show documents with No Keywords.
3 Search options are:
— Search Keywords Only: this is the default search mode. The project search tool will be set so that only Keywords are scanned throughout the project.
NOTE: can click multiple Keywords with this option and ONLY FILES/FOLDERS with ALL or ANY of the selected Keywords will show up in the search bar depending on the Search Operator you choose. The Keyword Panel will run the search on the chosen Keywords using the current settings in the Project Search Window including current choices in the Operator and Options section. You can change this and the search will automatically be rerun.
— Search All Content: the limitation above is lifted, and the words represented by the Keywords will be scanned for throughout all searchable areas of the project—in the main text editors, through binder titles, custom metadata, labels, synopses, notes and so forth. As above this option supercedes any current search restrictions in the Project Search Window.
— Show Document with No Keywords: simply put, any documents in your project that have no Keywords assigned to them will be returned in the result list. (this would be useful to see if chapters in your novel have do not have Keywords assigned. If the chapter or seen is missing Keywords she would be able to add them at this time by finding which ones were missing any Keywords.)
Note: If you split a document in Scrivener, then Keywords, label color, custom metadata including the compile setting, bookmarks, writing targets, and icons will be duplicated in the second half.
Hopefully, this will encourage you to use Keywords more frequently and be more comfortable with them. The potential uses are limitless and the choices are just awaiting your imagination.
Keyword Colors
Double click the color square before a Keyword’s name and will see the Select Color table to choose a new color for the Keyword.
Where can you see Keyword Colors?
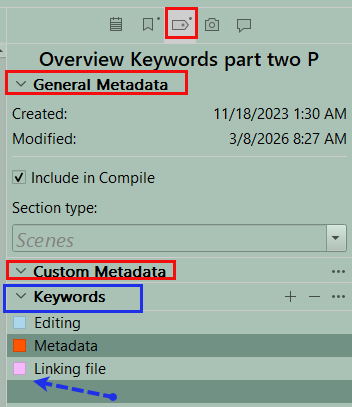
1. The Keyword Panel. Clicking on the color chip allows you to change the color of the Keyword.
2. The Inspector Panel under the Metadata panel.
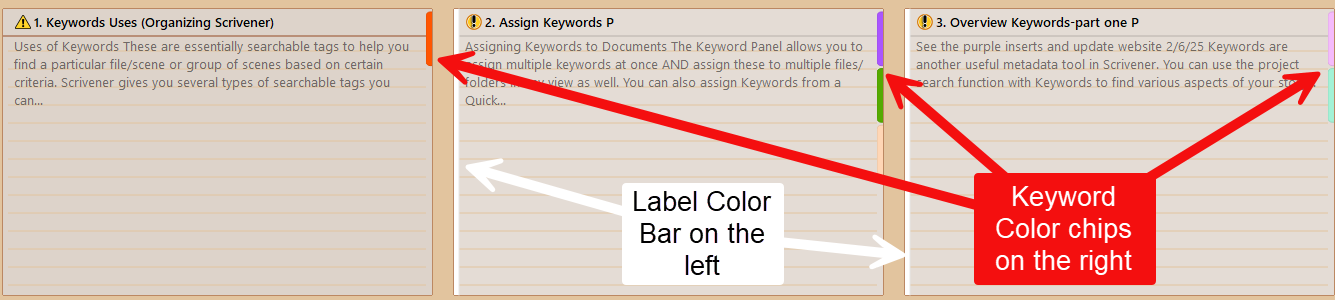
3. On the Corkboard Index Card
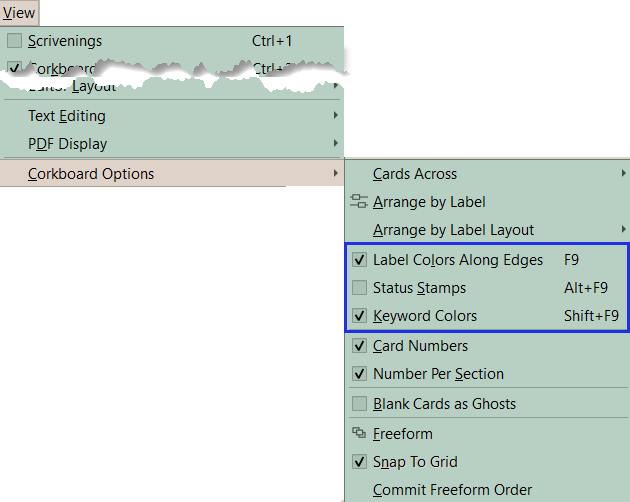
You can use the Menu command View > Corkboard Options > Keyword Colors [Doing this adds Keyword color chips to the right of the Index card, Label colors if checked will appear on the left side)
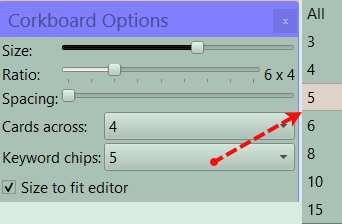
The number of Keyword color chips allowed is controlled by clicking on the Corkboard Options Icon (4 small rectangles in the lower right footer).
Updated 3/18/2026