the scrivener Binder Part three
The Binder’s Document Right Click Options:

Unlike the Editor where you must right click on the document icon to see the right click menu, in the Binder you can click anywhere on the Binder entry line to access this menu. When you right click a file or folder in the Binder you have multiple options to choose from. These are the same options that appear when clicking the … in the footer below the Binder. The Right click options for files and folders are slightly different.
Unique Right Click Options for Folders only:

The Ungroup command becomes an active option to move all subdocuments out of the current folder (or a document with subdocuments) at once when you are right clicking on the folder. You can manually move them back into the folder later if you want.
The Right click menu Section 1:
Here you have the choice to add a text (document) or folder below the current Binder document. [White box] Or you can add any current Template in your project. Any Template folders with subdocuments will have a caret (>) to the far right of its name which may be clicked to see any Template(s) inside the folder, which can then be added below the current Binder document. [Green box]. You can also add any existing computer file below the current one [Red box] remembering the limit that media files cannot be added inside the Draft folder. (Static images can be added into an existing document, but not image files in the Draft folder section.) [see below]

Section 1 of the Right click menu
Only in the Research Section, can you add web pages, but you will be asked to supply an internet address. Here is where you may place media files including videos, PDFs, or image files.

You must supply the web address
The Right click menu Section 2:
The Right click menu Section 2:
Here, you can assign Metadata to the current file/folder. This can be a new value if none was present or a change to the current value. You can use any Metadata currently in your Project Settings. Custom Metadata [Green Box] is available to be changed/added here. If for example, I can click on a caret (#2) to change the Status value from To Do (current value) to In Progress. Now, the file/folder will now show a Status of In Progress when viewed with the Inspector.
For compiling, you can change the Section Type for a single document or multiple documents or folders at one time.


Click the Status caret (#2) to access other options.
The Right click menu Section 3:
Allows you to Move Files around in the Binder or adding to Static Collections. (You cannot manually add files or folders to Dynamic Collections.)
If click add to Collections, you will see all your current Static Collections and can choose one to add the document or folder to any one. However, you can also add the document/file/folder to a new collection and name it anything you want after creating it.
If click move to have the option of moving the file to another location in the Binder. When you click the Draft Folder, then you will be able to maneuver to any file or folder in the Binder and put the selected file(s) inside the targeted file/folder.

As you use this option, you will build up a list of Favorites. (ie places you have moved documents to before) You will also see the option to move the next document you select to the same location the previous document was sent to.

The Right click menu Section 4:
If you choose the New Folder from Selection, then the currently highlighted document (you can do this with multiple documents as well) will be placed inside a newly created unnamed folder. (see below) If the selected document(s) is already within a folder, then the Ungroup option will become available within the Right click menu to ungroup the folder. Using this will take the documents inside the folder and place them below the folder you clicked on but at the same level in the Binder. These documents could still be inside a larger folder, but no longer inside their previous folder location. The folder will still be there, but empty.
Open Options Include (see below)

The Right click menu Section 5 (see above):
Here, the Open function has to do with how the current file/folder will appear in the Editor or be opened as a Quick Reference Panel or in a Copyholder view. (Windows Tip: If you hit the space bar, then the currently selected file/folder will be opened as a Quick Reference Panel.) If choose the Other editor, then the Editor window will split to accommodate this request.
For Media files you have the option to open in an External Editor, or open a web page in a browser.
You can display a folder with its subdocuments in a group view in this section or as a flat list on the corkboard. If the document is in the Research section then the option to open a media file in the appropriate external editor for the file type is available.
Reveal in Binder- This where show where your current file is in the Binder structure. This can be for one or multiple files. When you are inside the current file, then this option will not be active. This is especially helpful when a document shows up in a Search. Choosing this will focus the view on the section of the Binder containing the file.
Where Reveal in Binder will not work?
If you click on the current file in the Editor window that was just opened from inside the Binder. You have already found the file.
Reveal in Binder also does not work when you click on a document inside of a part of the Binder that has been Hoisted.
Show as Binder Separator- doing this will show a subtle effect to help highlight the file location in the Binder. How visible this is, depends on your current theme, but in general is subtle.
Binder Selection Affects- will show options on where the Editor’s current focus for the document is when you select it and options to change the focus.

The Right click menu Section 6 (see above):
Convert to Here the command will change depending on the document. It will be either Convert to Folder or Convert to File.
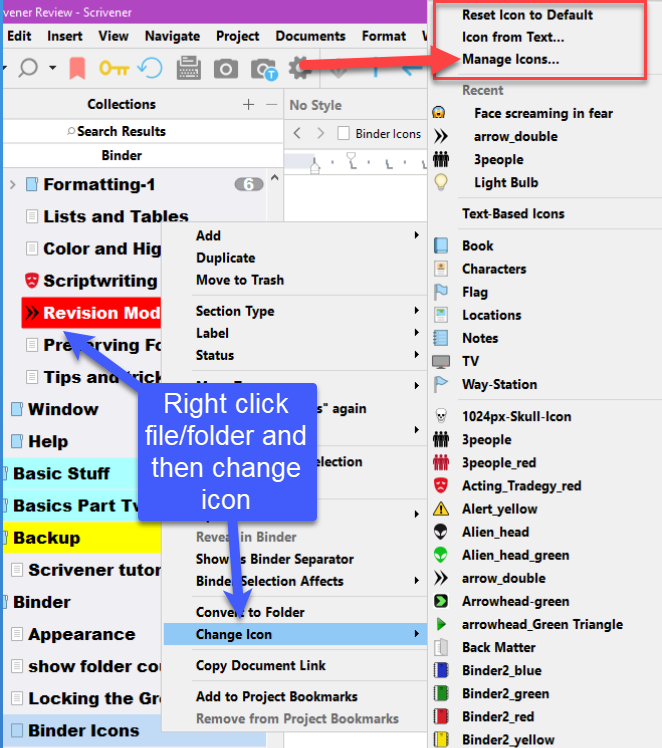
Change Icon will allow you to change the default icon appearance to a custom one. This can be one of the Scrivener custom icon options, emojis, or custom icons you add. Any Ico. File, Png file, or Jpg can be an icon file. Due to the small size of the Binder Icon, bold simple designs are best to use for custom icons. (see examples below with a simple design and color changes)

The Right click menu Section 7 (see above):
Copy Document Link- This allows you to copy a hyperlink for this document in your project and paste it somewhere else in your Project. (This will have a unique Scrivener identifier attached to it, but NOT the name of the document in this link.)
The Right click menu Section 8 (see above):
Add to (Remove from) Project Bookmarks- The option available for the document will be active. Ie you can either add a document to your Project Bookmarks or remove it. These are your only two options here.
Reveal in Binder-
This where show where your current file is in the Binder structure. This can be for one or multiple files. When you are inside the current file, then this option will not be active. This is especially helpful when a document(s) shows up in a Search. Choosing this will focus the view on the section of the Binder containing the file.
Where Reveal in Binder will not work?
If you click on the current file in the Editor window that was just opened from inside the Binder. You have already found the file.
Reveal in Binder also does not work when you click on a document inside of a part of the Binder that has been Hoisted.
Where to find the Reveal in Binder command?
Menu Commands
The Menu command Navigate > Reveal in Binder can be used to show the location of single files, or multiple files. Multiple file groups such as Collection results or Project Search results can all be highlighted inside the Binder at once using this command. This command will expand the Binder if necessary to reveal search results that lie within folders, sub folders, or sub documents.
Keyboard Shortcuts
The Keyboard shortcut is the Windows key + Shift + R.
In the Editor-
Right clicking the Icon itself for a file or folder in the editor window header will show the option to reveal the location in the Binder. This works in both halves of a split Editor.
This will also work for a Copyholder window in the split editor view by right clicking on the Copyholder’s icon (see below).


Right clicking on the Copyholder’s icon.

The specific Highlight color will depend on your current theme.
Quick Reference Panel
This also works for the Quick Reference Panel as well but only for the icon in the modified editor window.

Outliner View
Right-clicking on the icon in the title of any file/folder in the Outliner view gives the option to use the Reveal in Binder command.

Corkboard View
Right-clicking on the icon in the title of any file/folder in the Corkboard view gives the option to use the Reveal in Binder command.

Bookmarks
Right-clicking icons in the title of any file/folder in the Bookmark Manager or the Bookmark Panel in the Inspector gives the option to use the Reveal in Binder command. (This holds true for both Project and Document Bookmarks.)

Composition Mode
There is NO Reveal in Binder option in this mode.
Collections
You can select every document or several from inside a Collection and right click on these to use the Reveal in Binder option.

After clicking you will then see the selected items (3 in total) highlighted in the Binder (The highlight color is theme dependent.) in their current positions.

With Collections based on a character, location, POV, or keyword it may be helpful to see the distribution of the associated documents.
Binder Appearance and Behavior options explained:
Hiding the Binder
This is an option. You could have Scrivener layouts without the Binder, if you find this useful.
This can be done two ways:
1. Use the Menu Command View > Binder (If uncheck the binder checkbox then the Binder disappears.)
2. Use the View Toolbar Icon and check or uncheck the Binder.

Appearance Options
To display the number of files inside a folder:
Use the Menu command View > Outline > Show Subdocument Counts in Binder
However, you cannot number folders or files in the binder based on their order. However, you can display numbers of items in the Corkboard or the hierarchical numbering of the Binder in the Outliner view.
Icons
Scrivener comes with a number of default icons and variations, but any .ico file, .png file, or .jpg file can be used as an icon. Any images dragged into the Manage icons window will be converted to a .png file. Simple images will be more visible due to the small default icon size in the Binder, which cannot be changed without manipulating the code inside of Scrivener themes. [Which is above my pay grade.] Variations of the colors of geometric shapes (circles, squares, triangles, rhombi) can be very effective icons in the binder and how you use them to supply information is only limited by your imagination.
Icons could represent characters, locations, or themes. Colored letters on solid backgrounds show up well in Scrivener (like the B for beta readers and the R for revisions) Varying the letter background color can be used to give information of the status of revisions just like the label colors can be but can allow you two visible tools to supply information at a glance.
By using a dedicated set of icons for a document’s revision Status, you can preserve both Labels (Label colors) and Status for other uses. Labels could be used to mark your POVs presence in Scenes and the icon color can indicate a document’s review or editing status. Or you could have unique icons for characters, but remember icons are not searchable. How you use icons is up to you.
You can change the icon of any binder item (or group of items at the same time) by selecting and right clicking and you see the option to change its icon.
You can change the icon of any binder item (or group of items at the same time) by selecting and right clicking. You will now see the option to change its icon.
The Change Icon Menu allows:
1. To choose and change any current icon that has been added for this specific project for a file or folder
2. Choose an Icon from text.
3. Use the Manage Icons interface to add additional custom icons for your files and folders. (ico, png, or jpg files)
4. Note: You must manually add icons to each project and cannot drag them in from other projects. However, you can add them to a Project Template to use them again and again.

A mix of custom and standard icons.
In the Icon Manager you can highlight a current icon and use the minus sign to delete it, or use the + sign to add custom icons. When you click Change the Icon on the Right click menu, then you will see the interface below. Clicking Manage Icons will take you to the Icon Manager (above) You can also select Icons from text. (see below)

Icon from Text Interface
Custom Icons as Information

Same icon with different colors examples above and below.

Any Png file can be an icon file in Scrivener. Distinct Icons can be given color variations to indicate different stages in editing or writing.
I also use software icons to indicate the file has been reviewed by the software. For example, ProWritingAid

Geometric shapes work well as icons and show up well in Scrivener and using the same shape with different colors can be a visual indicator of writing or editing progress, saving the label function for other roles.
Scrivener has a default icons for a check box (to do) or unchecked box as normal default choices. (see below)

You use Letters with different background Colors as icons to give information and save labels for other uses.
Examples:
B=Beta Readers- red(out to reader), yellow (getting feedback), Green (back from beta reader).
F=Final Draft- yellow(almost there), green (done)
N=No Status
R=Revision Status in Scrivener-Red(first), Blue(second), Green(third), Orange(fourth), Purple(fifth) correlating with preset revision colors
T=to do list- white(non urgent), yellow(moderate urgency), red(significant urgency)

The Default Scrivener Icon chart with the icon and its meaning.

Change the Binder Appearance:
Use the Menu command File > Options > Appearance > Binder

Options include:
Highlight current Editor document indicator in the Binder- This will show a subtle highlight on the item currently being viewed in the Binder.
Spacing- This adjusts space between Binder items. You can experiment to see what looks best to you.
Indents- The option of Binder items extra indent pushes binder folders files further from the edge of the screen, (I feel easier to see), experiment hit apply to see these changes instantly and adjust to your preferences
Font choices include:
(In order to have fonts for the folder and files you must make sure the default Binder font is NOT ALREADY SET as a BOLD font or both folder and files will be bold no matter what you click) Some fonts have wider spacing between letters and this can affect how much of a Binder title you may see.
Document groups are defined as any document that contains subdocuments.
(see the Fonts tab below)
Colors

Changing this can apply and customize the appearances that you want. Once you make all the changes and are happy, then you can export preferences and save to use these settings in future projects or apply to new projects see preferences. You can easily adjust the background color of the Binder here if you want.
The Bars separating the Binder from the Editor and the Editor from the Inspector can be dragged by the mouse to resize windows.
Binder Titles
If the binder column is too narrow to see all of the title, if you hover the mouse over the title you will see the whole file/folder title in a popup window. This will also include some of the document’s synopsis or if there is no synopsis then some of the initial text in the document.

You can drag the divider between the Binder and Editor to change the Binder width.
Binder Separator
This is a tool to create a separator in the binder to help with organization.
You can do this by right clicking on any item in the binder and you will see the option to show as a binder separator. This effect is subtle. (see below)

Binder Titles options and functioning include:
1. You can manually type in a name or click inside a title to make the name editable,
2. You can use text you have selected to Auto-Fill the Binder title in. Set a title from existing text Select text you’ve written in the Editor by using the Menu command Documents > Auto-Fill > Set Selected Text as Title to replace the current title of the Binder Item with the text you selected. (((Maybe, more pain than it is worth as the Binder’s width limits the length of the visible title.)))
The Binder Sidebar area will display the results of Collections you select or Project Searches you do. Clicking the X in the header bars of either item will restore the Binder view.
Secondary Binder Highlights-
Under default settings, if the item you are editing is visible in the binder, a smaller secondary highlight will be placed on the item you are currently viewing. If this is not highlighted already. This can occur when you were in document #1 but use the carets in the editor to go back to a previous document #2. While editing in this document you will see a subtle highlight. (see below) This setting can be turned off in the Options Panel. (see below)

You can click this option on or off in the Options Panel under Appearance > Binder > Options. (see below)
