The Scrivener Binder Small Topics
Binder Behaviors
Hoist the Binder (Zooming In on the Binder)
Hoisting the Binder lets you concentrate on one container at a time in the Binder while putting the rest of the Binder aside.
If you Hoist the Binder, then you will zoom in on a local area (In the binder) and everything else in the binder will disappear. This is similar in appearance to that of a Collection and these files can be viewed in any of the three group views.
Steps to do this:
1. Highlight the Folder (or this could be a file with subdocuments) which you want to zoom in on. This does not affect the rest of the Binder.
2. Use the Menu command View > Outline > Hoist Binder (click the checkbox)
3. Or use the keyboard shortcut Alt + \

Click the Checkbox to activate.

Prehoist view (#1) of Binder outline shows every file and folder, but if we use the Hoist view (#2) of Binder folder then we focus just on the Binder folder and the rest of the Binder files and folders are hidden. Clicking the X exits this view.

1. Viewing the whole Binder

2. This shows the isolated folder Reviewed being Hoisted.
Diagram #2 shows the Reviewed (Container with subdocuments) now hoisted (ie isolated) (see above)
Clicking the X (#1) will close this view
You can click and view any individual file in the editor in this limited view by clicking the file to display in the editor as a text file. Clicking the backward Arrow (#2) will reload the entire hoisted container (Reviewed) back into the main editor in one of the three group view modes.
#3 is the Title of the Hoisted Container.
To get out of this specific view you must do one of the following:
1. In this limited view, if you click on the X in the far upper left-hand corner, then this will return your view to the original full binder view.
2. Use the Menu command View > Outline > Hoist Binder to uncheck the box and return to the normal view.
3. Use the keyboard shortcut Alt + \ again to exit this view.
How folders and documents with subdocuments will be displayed are set in the Options Panel.
Using the Menu command File > Options > Behaviors > File and Folders shows three possible options to determine how folders and documents with subdocuments behave.

These three Options include:
1.) Treat all documents with subdocuments as folders -
If this option is checked, then selecting any document (whether a file or folder) with a subfolder will allow the use of Group Views: Scrivenings, the Corkboard and the Outliner (act) as if they were folders.
2.) Include enclosing folder text in Scrivenings mode -
This only is active in Scrivenings mode. If this option is checked, then any text inside a folder WILL show up when using the Scrivenings mode. Scrivener will also remove the empty line of any folder without text. Unselect if you never use text inside folders.
3.) Show folder text when selected from search results -
This only applies to Search results. If your search results include a folder, then clicking on the folder will ONLY display the folder’s content rather than contents of any documents within the folder. Searching works on text usually, so the default is to show the folder text. (ie. The only reason the Folder appeared in the search results was due to a positive search result in the folder text. If the result was in a folder’s subdocument, then that subdocument would be listed in the search result.) This is enabled by default.
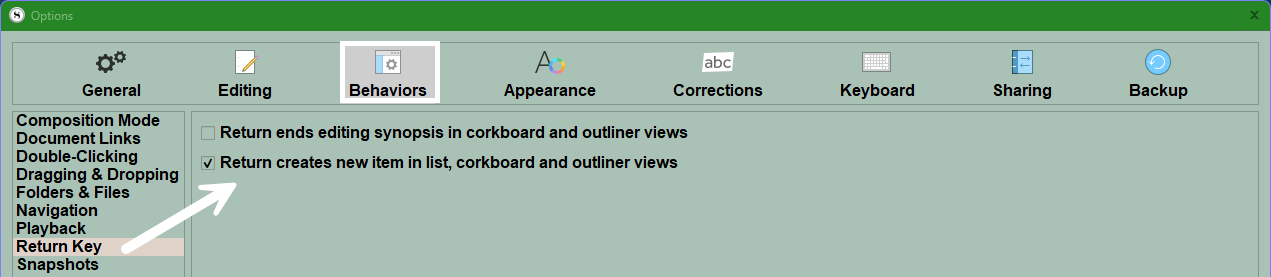
The Return Key
The Return key if clicked once will exit from a title of a file or folder you are editing and can do more based on which options you choose in the Options Panel.
Return Key options include:
If a file has been selected, then the pushing the return key will automatically add a text file below it at the same level.
If Folder has been selected, then the pushing the return key will automatically add a new text file inside that folder.
Dragging and Dropping Options include:

Alt-dragging creates duplicates -
Option A If checked then holding the Alt/Option key creates copies of any files or folders you drag with the same titles as the original file, instead of moving the items. (This option may not be helpful if just want to move the files)
Option B If unchecked then holding the alt key when moving a file/folder prevents the file being dragged from accidentally dropping into another single file as you drag it. (You can still drag into any folder/or file with subdocuments.)
Remember, a File Groups is created whenever one file is dragged onto another.
Allow drop-ons in Corkboard -
If you drop Index Cards on top of each other this create children of the top card. This works just like dragging documents into folders in the Binder.
Alt Key Navigation tricks:
Holding the Alt key while clicking on the caret to the left of a Folder will fully expand the folder and all of its subdocuments.
Holding the Alt (option key in Mac) key and clicking a folder will expand all the contents in the folder including any subfolders and subdocuments within those folders.
Holding the Alt key while selecting a Binder file/folder opens it on the right side of split editor, otherwise selecting binder elements opens on the left.
Document Menu
For A particular (single specific folder) folder in the Binder, you can set a default subdocument for that folder. (This will replace the default action of adding a blank text.) This can be any current template file or folder in your project. This will be added when you click the + sign either in the Main Toolbar or the + sign at the bottom of the Binder you will add a specific template file or folder instead of a blank text file (not sure would do). This can be useful for special folders like a Character folder. You might want to add a default character template instead of a blank text when you want to add a new character to your novel project.
Use the Menu command Documents > Default Template for Subdocuments

Printing the Binder
This is NOT possible, but you can print the outline to mimic this.
Long Distance Travel
Sometimes you may need to move a file or folder to a destination in the Binder that is currently off screen.
In this situation you can use other methods.
1. Use the Menu command Document > Move to
Whatever you move will be placed within the file or folder you choose to move it to. The item you select will become the parent for the selected item(s) you use this command to move. You can move a document anywhere in the Binder, but must remember restrictions on images, web pages, and media files.
2. Use the Editor Header.
A. Open the file or folder you want to move in the Editor.
B. Now scroll the Binder to where you want to move and drag the Icon in the Editor header bar into the Binder. The file/folder has now been moved.

C. Or reverse the process by opening a folder in the editor and locking the group view into either the Corkboard or Outliner views will work. In this view document icons dragged into the Editor folder icon will be added to the Folder.
How to quickly move multiple documents inside a Binder folder.
1. Select files (or can be folders as well) in the Binder you want to group inside a new folder. (These do not need to be adjacent to each other.)
2. Use the Menu command Documents > New Folder from Selection or Use the Keyboard shortcut Alt +Shift + G.
3. Name your new folder

Shifting the position of multiple documents in the Binder at once.
You can select multiple files and folders and move in the binder using the arrow keys to change their position up or down, or change the file/folder level at once.
Select the files you want to shift, then use the highlighted arrow commands available (if in the main toolbar, or keyboard commands). If pick separated files and use the up and down arrows, then they will shift position and maintain current separation.
Copying Files and Folders between Projects
When copying items between different projects, Scrivener tries to keep as much of the item’s information including metadata intact. An item dragged from one project to another is a copy and the original file remains intact.
The easiest way to copy a file from one project to another will be through the following steps:
1. Open both of the projects at once.
2. Drag the item icon from the binder, corkboard or outliner views of the first project.
3. Drop the icon into the second project where you wish the item copied.
4. Alternatively, use the Documents ▸ Copy to Project ▸ submenu to file the selected documents directly into another currently open project, via the binder item selection menu. Note this works but the first project must be closed and reopened to see the other open projects to transfer to them.
What happens to the copied file/folder depends on where you place the imported document.
You can put the copy between or inside existing items in the new project.
However, if you drop the item into blank Editor window or one with text, then you’ll get an import of the text or a link instead.
If you drop another project’s file into the new project’s bookmarks list, then you’ll get a handy link instead of a copy.
Scrivener will not copy default subdocument section types or default templates for subdocuments. Compile settings do not transfer either.
What can be imported into the Binder?
Importing Files
Importing Files into the Binder means the files will be copied and may be altered as they are placed inside the Scrivener Project. Outside of the Research Folder the imported files must be text files, though they can include static images. The original files on the computer are NOT altered in any way. Note when importing text documents some formatting and possible data loss may occur. Information is imported where the current Binder selection is.
Use the Menu command File > Import > Files or the Keyboard shortcut CTRL + SHIFT + I.
Importing Web Pages
This can only occur inside the Research Folder. Outside of the Research folder this option will not be available in the menu.
Importing Research Files as Shortcuts
This also can only occur inside the Research Folder.
Rather than fully importing items into the project, this command establishes a link between the original item and the project. This link will be broken if the original item is moved or renamed, but you will be given the option.
Linked resources in the Research Folder will have a small curved arrow in the lower left corner of the file icon. They will behave exactly like a normally imported file. However, since it is linked rather than inside the project, it will keep the project size smaller. This can be a real advantage if you refer to a lot of research materials in your project.
Use the Menu command File > Import > Research Files as Shortcut to keep the research files external but linked to your project with a meaningful name. When using this command, the Imported Shortcut will be opened in a document one down from current one.
Importing Projects
If you Import an entire Scrivener Project this will be imported into the root level of the Binder into a single folder named for the Project at the bottom of the Binder. Use the Menu command File > Import > Scrivener Project.
Importing Outliner (OPML files) or Mind Map (MM) files
If you Import Outliner files using OPML or .mm (Mind Map) formats these can be imported and will retain their hierarchy and convert it into a Binder outline of files and folders. (Scrivener will import Scapple Projects and each note will become a file in the Binder.)
Three Methods
1. Drag and Drop- Take the file(s) and drag them into the Binder, Corkboard, or Outliner views. If you drag a folder with subdocuments, then those subdocuments will also be added and the file structure of the folder will be recreated in Scrivener.
2. Menu command File > Import- (This will open the Windows Explorer so you can locate the file/folder to import directly. The type of file will determine where you can import into Scrivener. IE Media files/Web files can only be imported into the Research folder.)
File > Import > Import and Split will attempt to split files with an innate structure, or you can place a symbol (ex. ###, ***) to tell Scrivener where to split the file you are importing into separate documents.
3. Copy and Paste- This method may work best to transfer small or even large chunks of information into Scrivener.
Exporting Binder Files
Two Methods
1. Menu command File > Export > Files
2. Keyboard shortcut CTRL + Shift +X

For exporting a single File-

For exporting multiple files (You will need to designate a folder to save these files in)-

You have options on which format to use when exporting documents. These include:
Adobe PDF
Rich Text (rtf.)
Microsoft word (doc./docx/)
Open Office (.odt)
Office XPS (.xps)
Web Page (.html)
Final Draft (.fdx)
Fountain Screenplay (.fountain)
Plain Text (.txt)
MultiMarkdown (.md)
All media files will be exported as is.
When multiple files are being exported, Scrivener will try to reflect the Binder structure of the exported files.
Expanding and Collapsing the Binder Tree Tips
If you collapse a folder with a large number of subdocuments the state of these is remembered. (If subdocuments are open in a folder you close, then when you open the folder again those subdocuments are still open.)
You can use the arrow keys to move up and down in the binder and the left or right arrows move up or down the binder tree hierarchy or add those options to the toolbar.
Fully collapse or expand all the folders using the toolbar icons the Menu commands View > Outline (collapse or expand all).
Use the Keyboard Shortcuts Alt + ] (Expand All), or Alt +[ (Collapse All)

Use the Main Toolbar Icons (If added)

Expand All

Collapse All
Fully collapse or expand a folder and all of its subdocuments by holding the Alt key when clicking on the caret to the left of the folder name to fully expand a folder. Repeating this move will fully collapse a folder.
Hoisting the Binder to isolate a section of the binder. View > Outline > Hoist Binder (see above menu)

Titles and Naming
Double click a title to rename it or edit the document name. (Clicking the F2 key will enter the editing mode for the currently highlighted document as well.) Hitting the return key will exit the editing mode.
If you leave a document title blank, then Scrivener will use the first words in the document’s text to supply a title. This title will have a appearance in color and format to distinguish from documents where you supplied a title. If a synopsis is present then the first line of text in it will become the title.
Scrivener will add the generic title Untitled Document or Untitled Folder

#1 Normal document titles.
#2 Scrivener is using the first few words from the document’s text to supply the title and this title has a distinctly different appearance from a normal title.
#3 Here Scrivener supplies a generic title for an empty document. (Again, the font of this is distinctly different from normal titles.)
Various other Menu Title Options

Adaptive options using the Synopsis or Titles based on the main text will be used as the document’s title when use File > Export Files command but not as compile titles unless you adjust the Compile settings. See section 24.2.2 in the Scrivener manual for more information.
You can also select text within a document and then use the menu (see above) to Set Selected Text as (the document’s) Title.

Options for titles in the Compile Format Designer.
Do Adaptive Titles Export?
Adaptive names will be used when exporting individual binder items via the File ▸Export ▸ Files… menu command.
Otherwise, these are not real titles, they are meant to be useful tokens of representation while working in the project. Thus, by default they will not be included in the compiled output as a formal title. This policy can be changed as part of your compile format settings, in the compile format pane. (see above)
Recovered Files
When updating older projects to Scrivener 3 there may be a large number of older files being sent to the Trash folder as recovered files due to conflicts. This is Scrivener going through old duplicate files.